Check out the system file checker, what it is meant for, how to use it, and the interpretation of its results.
Intentional or not, there are many ways a user tampers with the files that are essential to your computer. Even a power outage during an ongoing Windows update can bring unwarranted issues to your machine.
Besides, force shutdowns can also modify system files hindering normal system operations. And let’s not get started on what malware can do to your PC.
While there are plenty of third-party tools asking to fix every problem a Windows PC might have, it’s best to use native troubleshooting first.
System File Checker (SFC)
System file checker is one of the built-in tools in Windows to help out in case of random crashes or system file corruptions.
In the best cases, you can get it done in a few minutes. For others, you may need to manually help it out to fix the anomalies.
It’s prescribed to run the Deployment Image Servicing and Management (DISM) before using the system file checker. You can check this single-step process at our repair Windows with DISM guide.
Notably, one can run the system file checker from the native system or use recovery media if the system isn’t booting.
SFC from the Same System
First, open the command prompt with administrator privileges (aka elevated command prompt).

Subsequently, type sfc/scannow and press enter to initiate the process:

The scan will take a few minutes and can result in either of these outcomes:
- Windows Resource Protection did not find any integrity violations.
- Windows Resource Protection found corrupt files and successfully repaired them.
- Windows Resource Protection found corrupt files but was unable to fix some of them.
- Windows Resource Protection could not perform the requested operation.
Please check the following sections based on the above-listed end results.
1. Windows Resource Protection did not find any integrity violations.
This indicates system files are intact, and there is nothing to do further.
However, you still landed on this article means there is something off with your system.
So, restart your system, and to ensure there isn’t any malware on your PC, including spyware or virus, go for a full system scan with these premium antivirus solutions.
Alternatively, you can run a free malware scan with Malwarebytes.
2. Windows Resource Protection found corrupt files and successfully repaired them.
This is another result where you don’t need to do anything else.
However, you can check the log file at %WinDir%\Logs\CBS\CBS.log, indicating details of the repair.
Next, you can reboot and check if the problem persists. Finally, follow the malware scan steps in the previous section.
3. Windows Resource Protection found corrupt files but was unable to fix some of them.
Some problems require manual intervention, and this is one such issue.
Put simply, you would find the corrupt file and replace it with the good one from a computer having the same version of Windows as yours.
First, open the log file by navigating to %WinDir%\Logs\CBS\CBS.log. This will open the log file into the Notepad you can save to the desktop for convenience.

Notably, this will show the results of recent scans performed on the subject computer. Ergo, scroll down to the latest scan and try to find something like Cannot repair member file or Corrupt file with no repair information.
These will give the full path of the file you need to replace with a working copy. As a best practice, run the sfc/scannow on the source to ensure the good health of the import.
Next, use the following commands in succession via the elevated command prompt to enable copy-paste privileges for the corrupt file.
takeown /f filepath\filename
icacls filepath\filename /grant administrators:f
This would look like this for the AcGenral.dll file in the System32>Windows>system drive.
takeown /f C:\Windows\System32\acgenral.dll
icacls C:\Windows\System32\AcGenral.dll /grant administrators:f
Finally, replace the faulty file with the working one.
Reboot the PC to see if the issue is resolved. As an extra step, run a full malware scan with tools mentioned in the first section if you don’t have any antivirus installed on the system.
4. Windows Resource Protection could not perform the requested operation.
This asks for a little more work from your side.
First, boot your Windows PC in safe mode. Safe mode starts your PC with the unavoidable drivers and basic utilities.
Once there, open the command prompt, and run the system file checker. Afterward, proceed as per the previous sections based on the scan results.
SFC from Recovery Media
You will need to create a Windows recovery disk before proceeding. Next, boot the faulty system from the recovery disk.
This can be done by pressing specific keys to enter the BIOS or system setup to boot from the recovery media. These keys depend on your system manufacturer or motherboard brand if you have a custom PC.
Next, power on the device and keep pressing that particular key during the logo screen.
Afterward, search for the boot order and select the recovery disk to boot from it.
You will land on the Windows installation wizard. Go through the initial setup asking for language, keyboard, etc. On the second screen, click on Repair your computer.

Next, enter into Troubleshoot, followed by clicking Command Prompt on the subsequent screen.

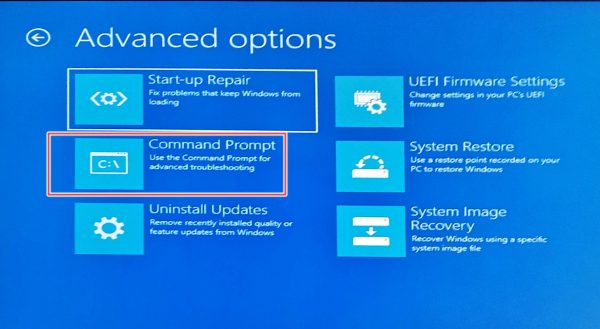
This will open a standard Command prompt where you can enter sfc /scannow /offbootdir=c:\ /offwindir=c:\windows to initiate the repair.
Here, the offbootdir and offwindir refers to the system drive and the windows installation directory. You should replace c: it with the appropriate letter as per the subject computer.
Let the scan complete and exit the system setup to boot normally.
Finally, I recommend a malware scan to resolve any remaining issues.
Conclusion
System File Checker (SFC) repairs the system drive for any misconfigurations. Usually, it takes a few minutes to complete, but it can ask for some work depending on the issue. Besides, it’s best to use this after running the DISM tool to further improve the system’s stability.
One can use this command internally from the same computer or externally if the system isn’t booting.
Still, there may be times you need some automation in the repair department, so here’re some Windows problem solver tools to take note of.