One of the most popular content management systems WordPress, stores and collects data from a robust database. The pages, posts, data, or any information you are viewing on a WordPress site are all retrieved from a database.
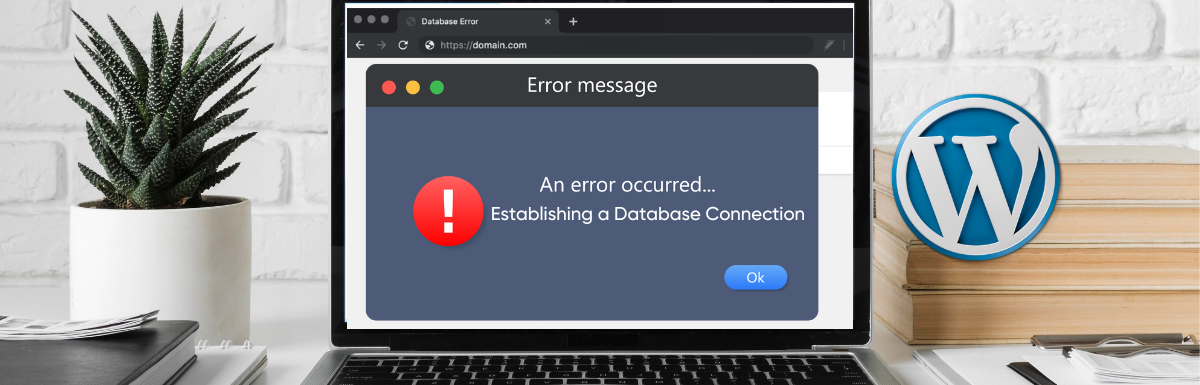
But sometimes, the awful “Error Establishing a Database Connection” can show up. Fortunately, this error can be resolved within a few simple steps.
However, the error message can be the result of poor server configuration, database connectivity, or erroneous credentials. The message indicates that WordPress is unable to connect to its database. Thus, it is hampered from retrieving the essential data needed to properly display your website
Running across this error can be really upsetting, but it’s a common error faced by WordPress users. In this article, we will explain the causes of “Error Establishing a Database Connection.”
Then we will provide troubleshooting steps to resolve the issue and restore your website’s functionality in under 10 minutes.
Root Causes Of The Error Establishing Database Connection in WordPress
By determining the root cause of the “Error Establishing a Database Connection,” you can take an in-depth troubleshooting strategy. Here are some typical reasons behind the error:
Erroneous Database Credentials
One of the main reasons behind this error is when the database credentials supplied in your WordPress configuration file (wp-config.php) are incorrect. This contains host information, database username, password, and the database name. Therefore, WordPress won’t connect to the database if these credentials are inconsistent in any way.
Damaged or Corrupted Database
Connection problems can be the result of a corrupted or damaged database. Software incompatibilities, inadequate upgrades, or incorrect database management might all be to blame for this. In certain circumstances, WordPress has connectivity issues and displays an error message.
Server or Hosting Limitations
Problems with the server or hosting environment can often result in a database connection issue. This can be the result of a crowded server, a lack of resources, or a brief downtime. WordPress may also be unable to establish a link to the database due to limited memory allocation or severe firewall regulations.
Unavailable Database Server
When the database server is down or has connection issues, WordPress won’t be able to connect to the Database server. This is usually caused by network problems, database server technical difficulties, or server maintenance concerns.
Conflicting Plugins or Themes
Sometimes, conflicts between plugins or themes can obstruct WordPress database connection. Incompatible or poorly developed plugins or themes can concurrently try to access the database. Thus, conflicts with the database occur that lead to the “Error Establishing Database Connection error”.
Exceeding Database Storage Quota
If you go over your hosting plan’s allotted database storage quota, the database connection error will show up. When numerous websites share the given database capacity under shared hosting plans, this often happens.
Now that you know the reasons behind the error, it’s time to learn how we can resolve it.
Explore the following effective solutions to resolve the “Error Establishing a Database Connection” error in WordPress. Before proceeding with any troubleshooting, it is crucial to create a backup of your website to safeguard against any unforeseen issues. In the event of complications, having a backup will allow you to restore your site to its previous state.
Verify Database Login Credentials
Providing incorrect WordPress database login credentials is the most frequent cause of database connection issues in WordPress. This usually happens after switching your WordPress site to a different hosting company. However, these are the steps you can follow to resolve the issue:
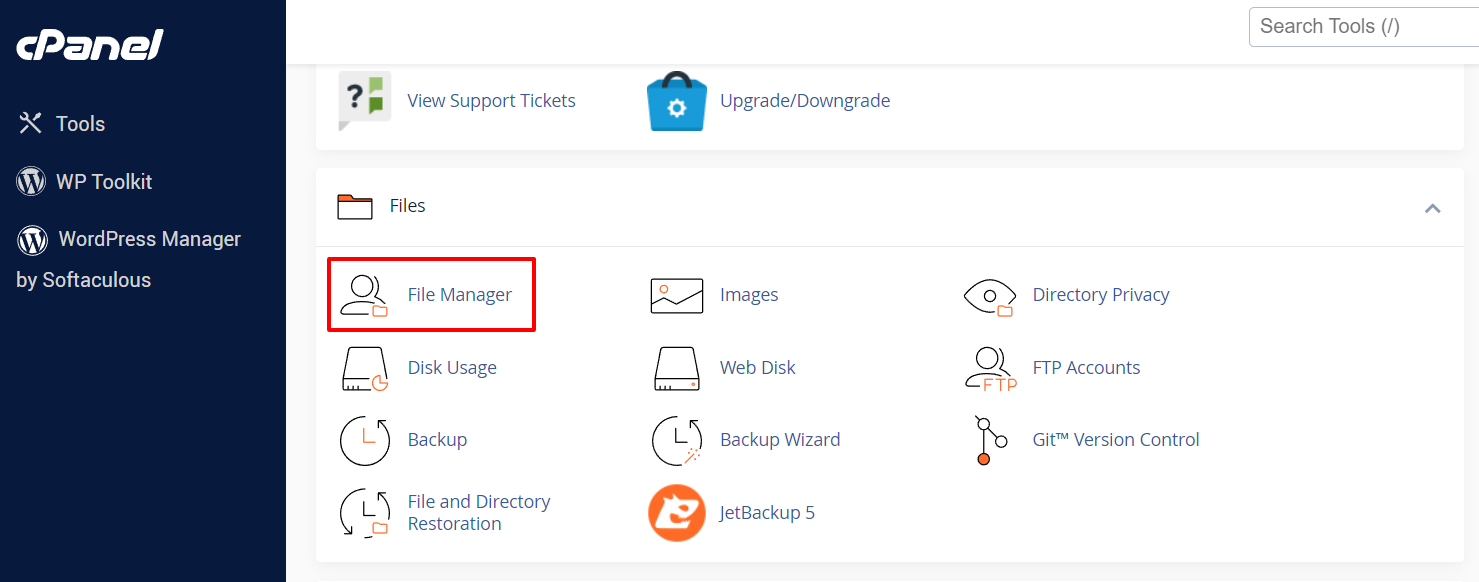
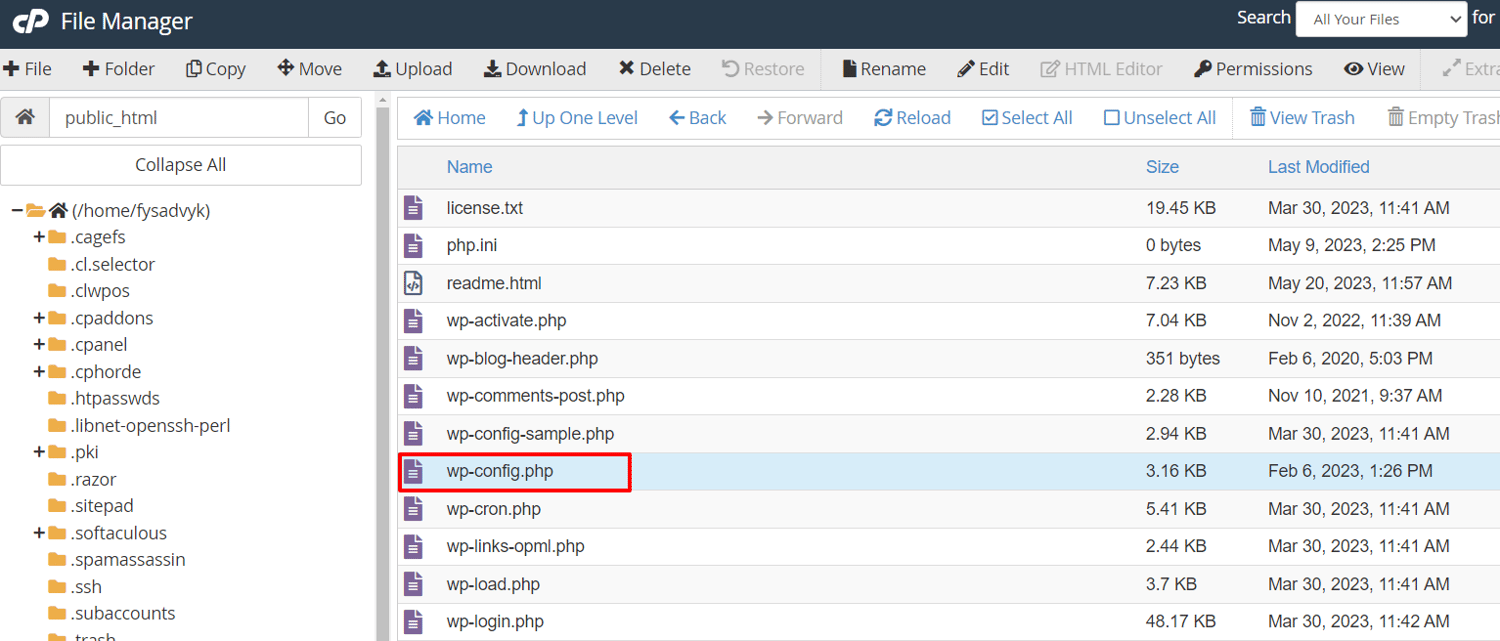
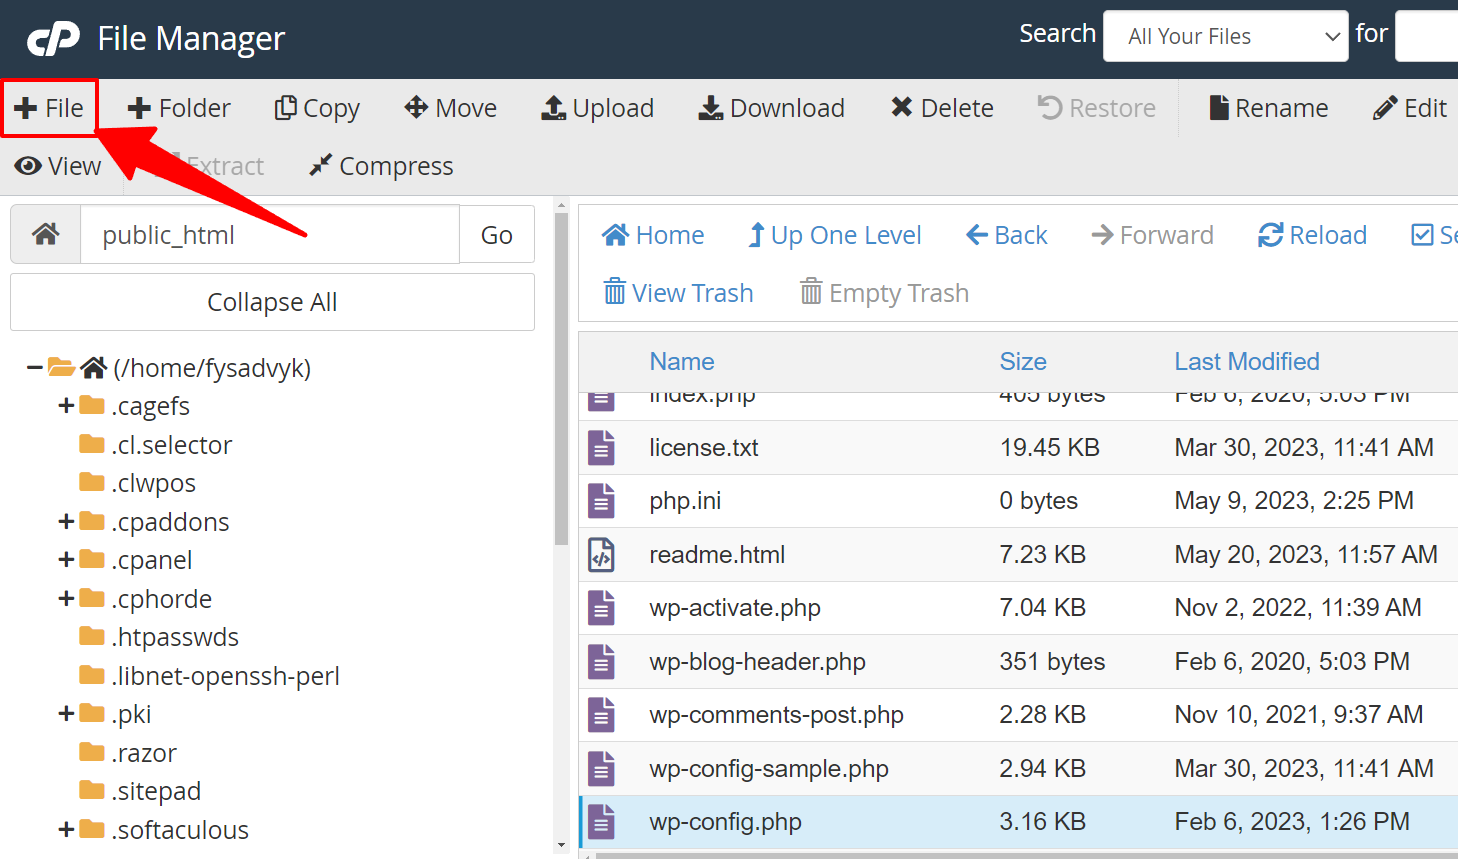
#1. Locate the wp-config.php file
You will get your WordPress database credentials in the wp-config.php file. This file serves as the configuration file for WordPress, containing essential settings for the database, including database information. You can access this file using an FTP client or logging into your cPanel.
#2. Edit the wp-config.php file
Editing the wp-config file is a crucial step for checking and editing the database credentials. Through this file, you can also see other WordPress errors such as Memory Limit Error, White Screen of Death Error, No Such File In Directory error, and more.
#3. Identify Relevant Lines
Now, check out the following lines that contain the MySQL settings and the database information.
// ** MySQL settings - You can get this info from your web host ** //
/** The name of the database for WordPress */
define( 'DB_NAME', 'database_name_here' );
/** MySQL database username */
define( 'DB_USER', 'username_here' );
/** MySQL database password */
define( 'DB_PASSWORD', 'password_here' );
/** MySQL hostname */
define( 'DB_HOST', 'localhost' );
#4. Verify Database Credentials
Ensure that the information provided for the database name, username, password, and database host is accurate in the wp-config.php file.
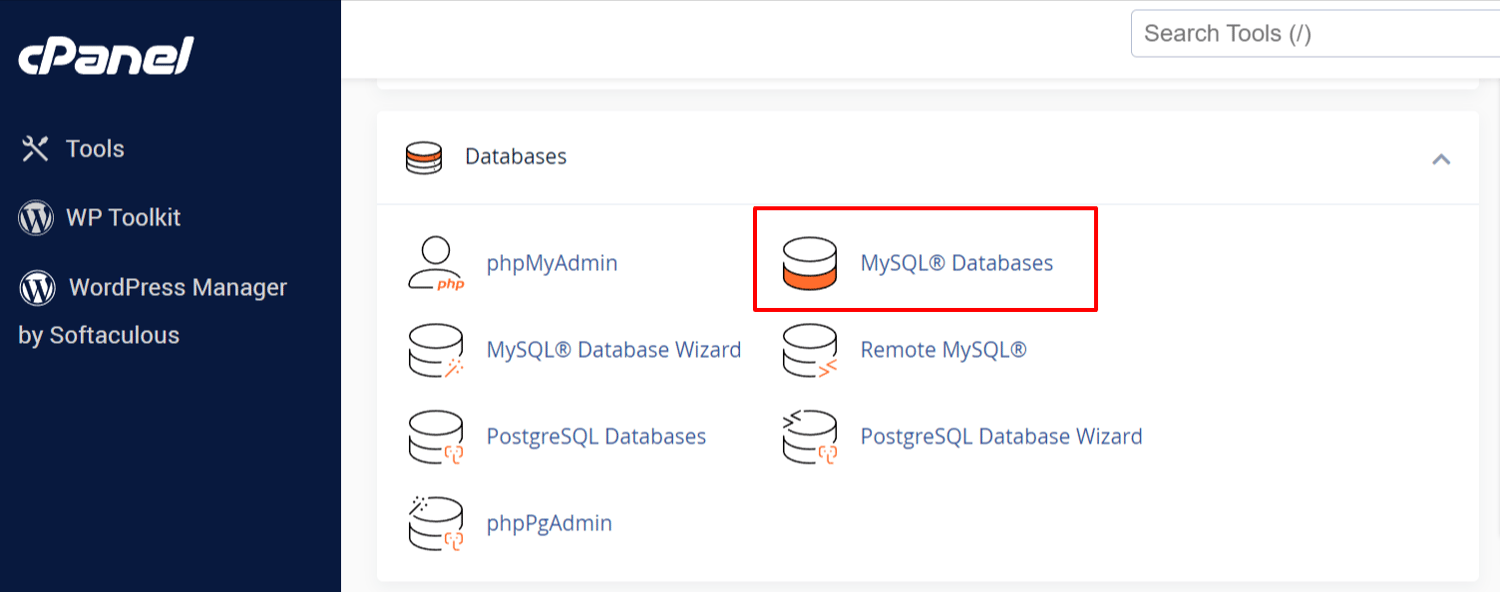
#5. Confirm Database Details
Simply log in to your WordPress hosting account and go to the database area. Then check out the MySQL database or a similar option since it can vary depending on your hosting provider’s cPanel.
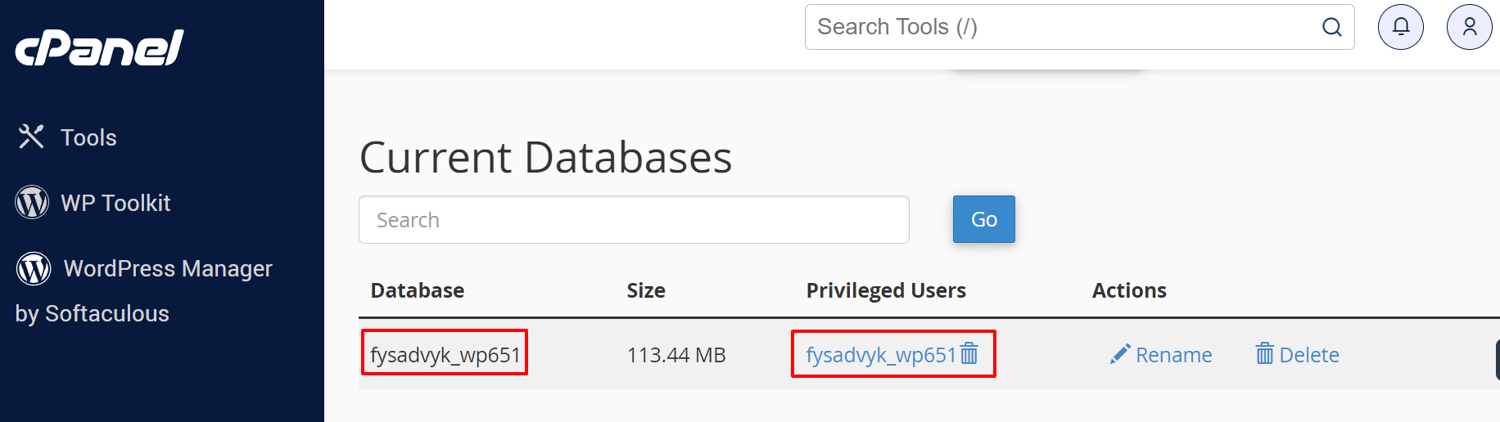
#6. Access Database Information
Identify the database name along with the username on the database administration page of your hosting account dashboard to access the database information. Take note of this data since it will be necessary for the next actions.
#7. Alter The wp-config.php file if Needed
Make the necessary changes to the wp-config.php file if you notice any differences within the database information in the wp-config.php file compared to those from your hosting account. Check that the settings for ‘DB_NAME’, ‘DB_USER’, ‘DB_PASSWORD’, and ‘DB_HOST’ correspond to the right database information.
#8. Run a Connection Test
Re-visit your website after saving the wp-config.php file’s modifications. Verify the database connection problem is now fixed. Continue with the following troubleshooting procedures if the issue continues.
Repair The WordPress Database
The error message “One or more database tables are unavailable” indicates that your database needs repairing. In this case, here is the process you can follow to repair your database:
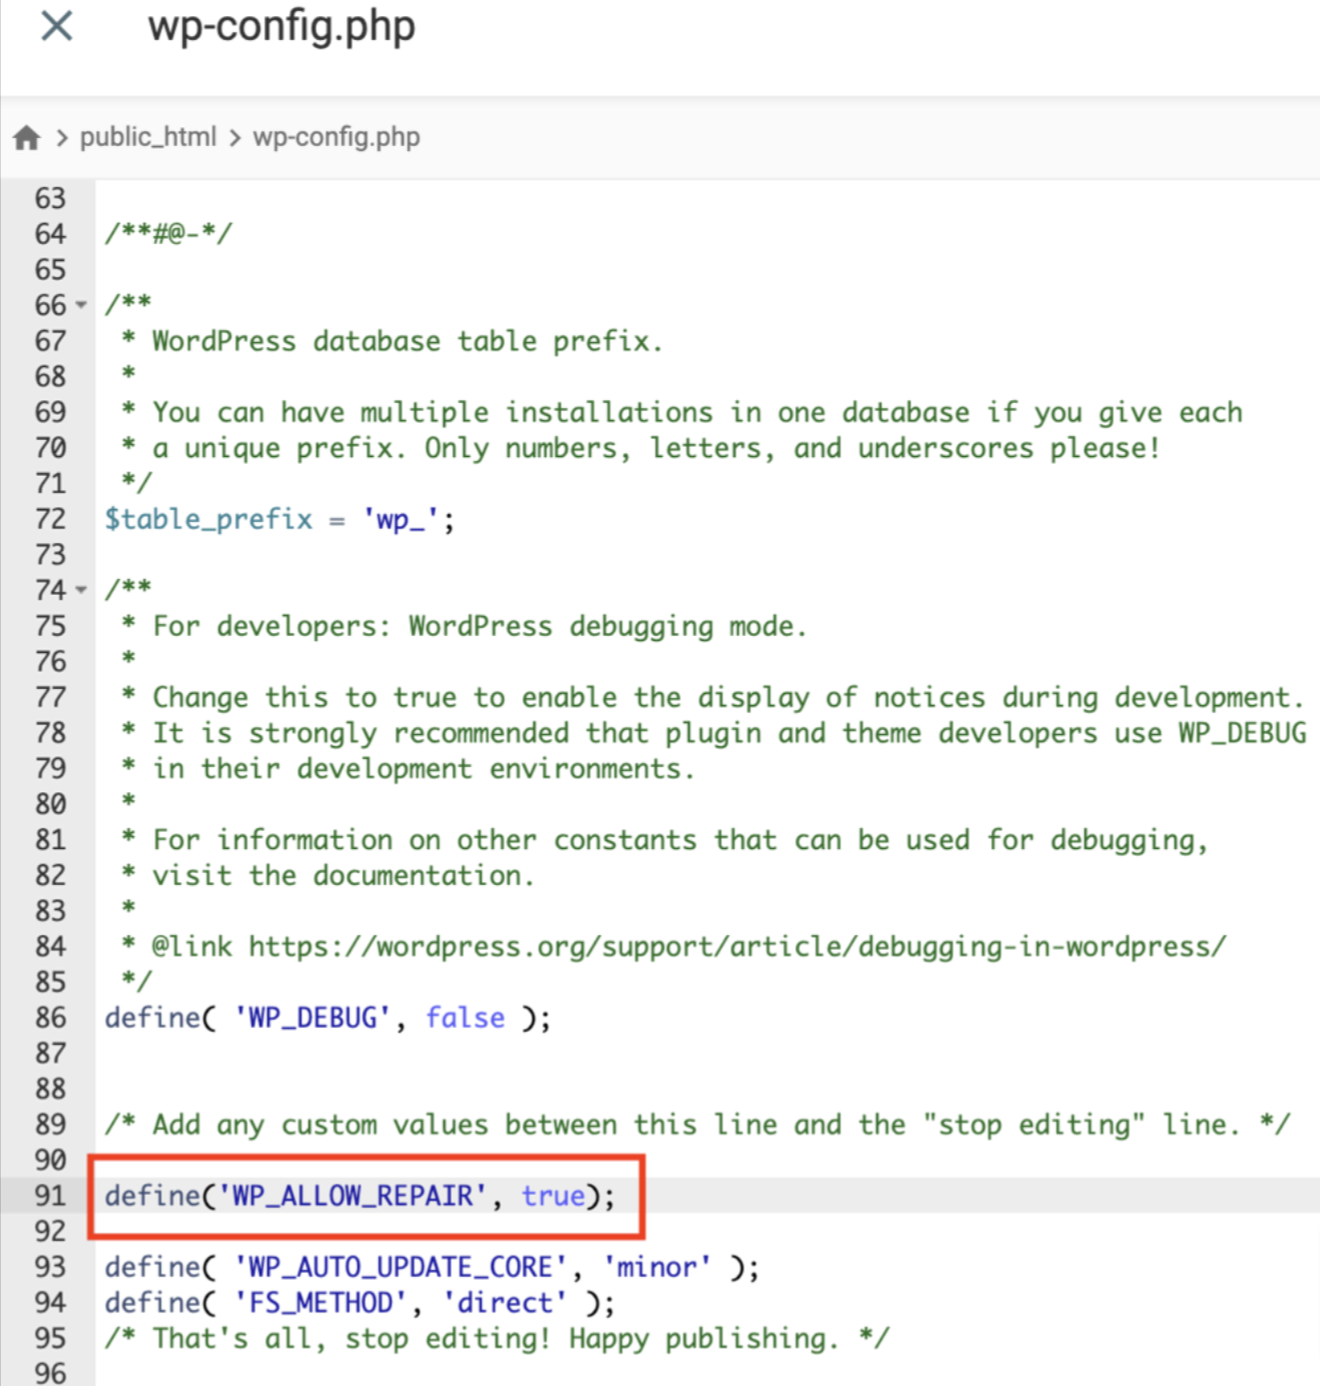
Access & edit the wp-config.php file:
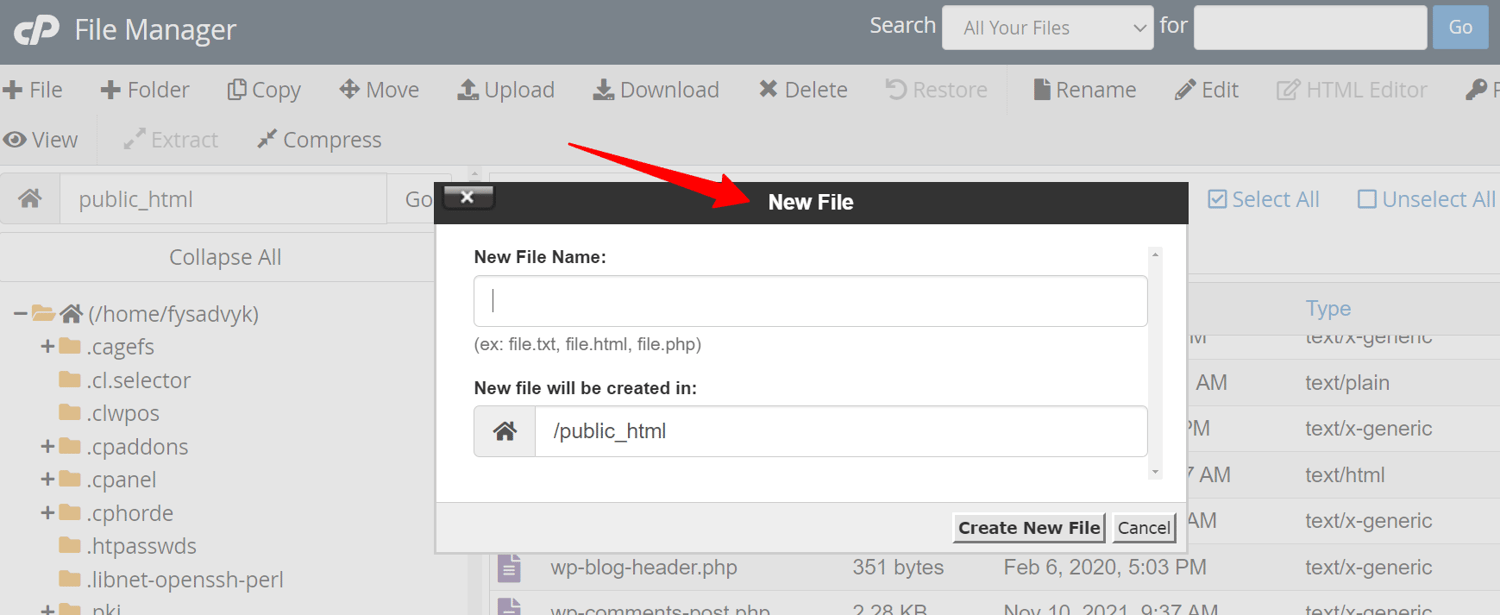
As we mentioned earlier, the wp-config.php file contains crucial settings like database information and credentials. Firstly, you need to locate and access this file using a text editor. Then, simply add the following line just before the line, “That’s all, stop editing! Happy blogging!”
define('WP_ALLOW_REPAIR', true);Now, save the wp-config.php file after applying the changes.
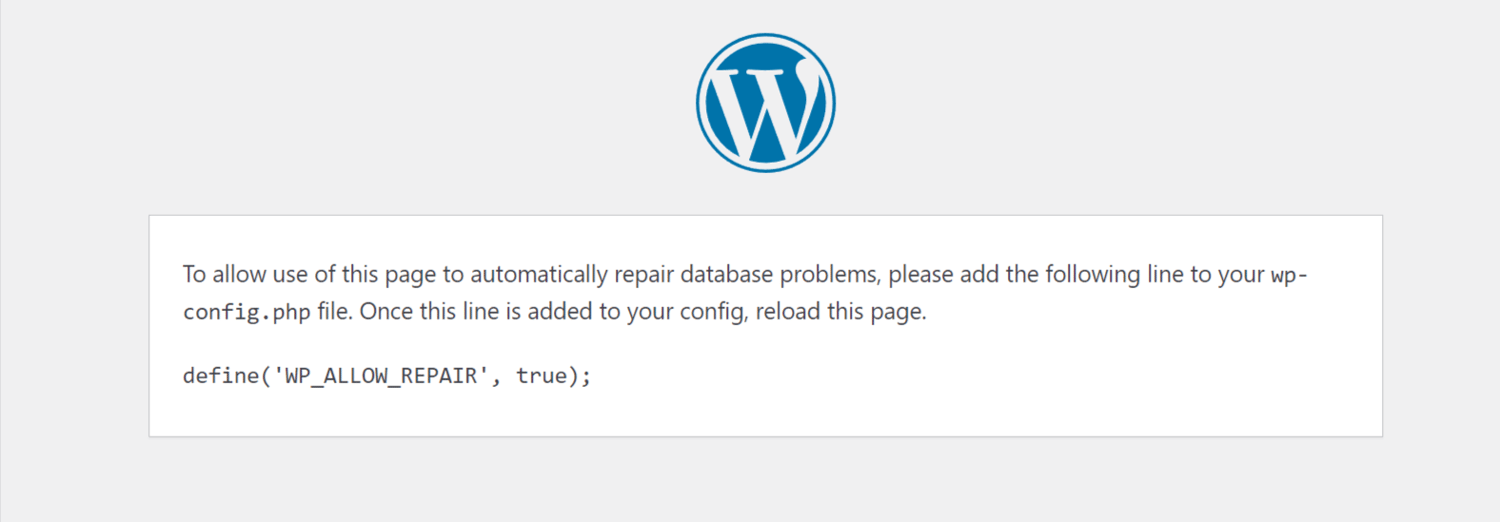
Access the repair page: Go to your web browser and visit the following URL, but instead of “yoursite.com,” palace your actual domain name:
http://www.yoursite.com/wp-admin/maint/repair.php
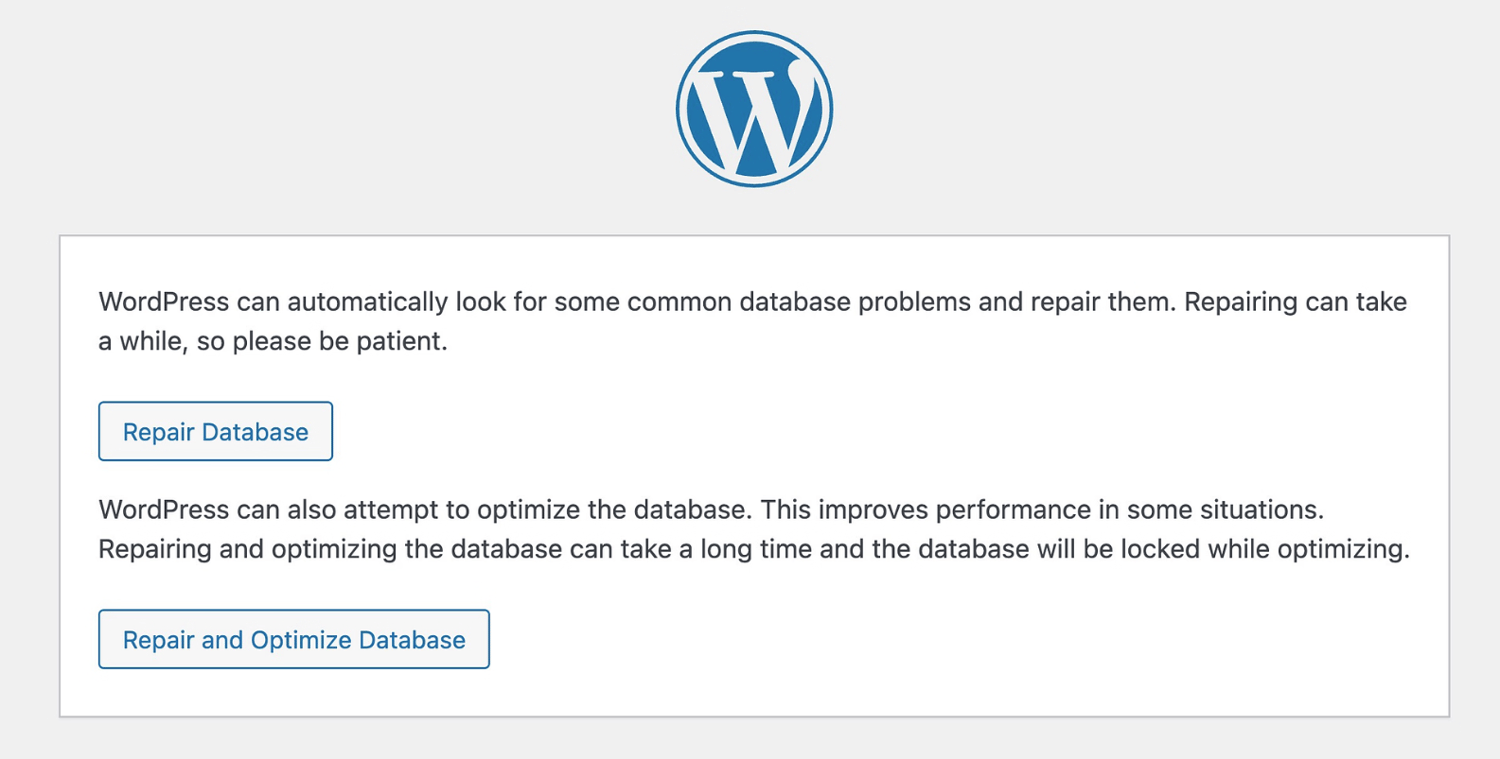
Repair the database: You’ve now been sent to the WordPress database repair and enhancement page. Keep in mind that you don’t need to log in to access this page. At this stage, simply follow the directions given on the page and optimize your database.
Eliminate the Code: It’s crucial to take the additional line out of the wp-config.php file once your database has been properly repaired and optimized. So, remove the following line by commenting on it:
// define('WP_ALLOW_REPAIR', true);
Ensure Database Server Availability
Your WordPress website may display the “Error Establishing a Database Connection” warning while the MySQL server is offline. This problem often occurs when there are more connections than the server will allow.
Your WordPress website may display the “Error Establishing a Database Connection” warning while the MySQL server is offline. This problem often occurs when there are more connections than the server will allow.
It is advised that you get in touch with your host in order to identify and fix this issue. Tell them about the problem and request that they examine the MySQL server’s condition.
#1. Check MySQL Connection Permissions
If you’re using single-site hosting, make sure the WordPress database user has the proper access for connecting to MySQL. Making a PHP file and checking the connection are two ways to do this.
- Access Hosting Control Panel: Enter the hosting control panel by logging in and going to the public_html folder of your WordPress website.
- Create a New PHP File: In the public_html folder, create a new PHP file. You can give it whatever name you choose, like “test.php”.
- Insert Code: Put the following code into your PHP file.
 <?php
$link = mysqli_connect('localhost', 'username', 'password');
if (!$link) {
   die('Could not connect: ' . mysqli_error());
}
echo 'Connected successfully';
mysqli_close($link);
?>- Update Credentials: Replace the ‘username’ and ‘password’ of your actual MYSQL database username and password.
- Save & Access the File: Save the file and open it in your web browser by going to the relevant URL (for example, http://www.yoursite.com/test.php).
#2. Confirm Successful Connection
Once the PHP file connects to the MySQL server and shows a “Connected successfully” message, your user likely has the necessary rights. This shows that the “Error Establishing a Database Connection” warning might be brought on by another source.

#3. Optimize Server Resources
Resource constraints can end up in database issues for websites hosted on shared servers. Thus, you can consider using website caching with plugins such as W3 Total Cache or WP Rocket to relieve this. These caching plugins may increase speed while reducing the load on the server.
Resolve Themes & Plugins Issue
Corrupted files can also be the reason behind the “Error Establishing a Database Connection” in your WordPress site. Here is the process that you can follow to resolve this issue
#1. Identify Faulty Theme or Plugin
Actually, faulty themes and plugins are commonly the reason behind corrupted files. Examine each Theme and plugin independently to see which one is to blame for the error. When an issue occurs after activating a new theme, the theme is causing it.
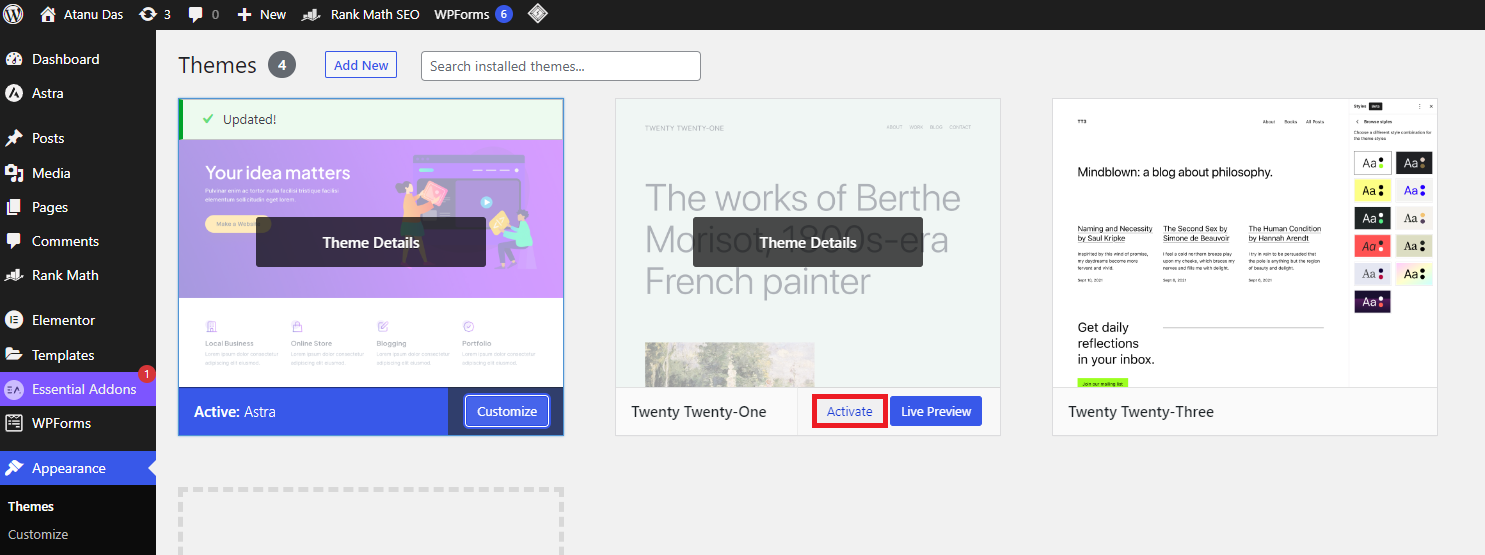
#2. Change The Theme
To fix the issue, log into your WordPress dashboard and go to Appearance>Themes. Then change the current theme by choosing and activating a different one.
#3. Change Corrupted Plugin
If changing the theme does not resolve the “Error Establishing a Database Connection” issue, look for any potential plugin corruption. To find the corrupted one, disable all plugins and then reactivate them one at a time.
#4. Disable Plugins Via Hosting Control Panel
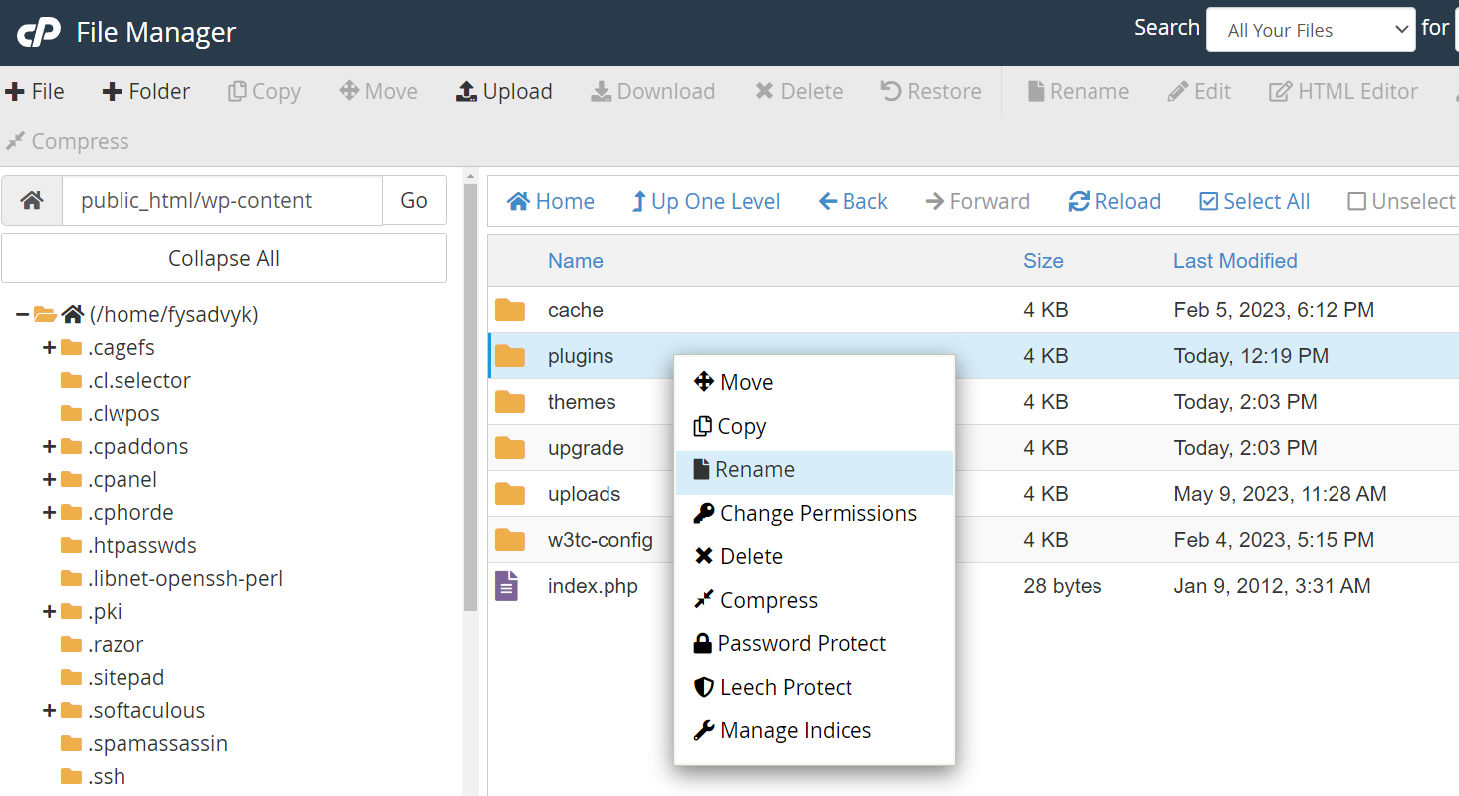
You can also rename the plugins folder in your hosting control panel to disable every WordPress plugin. To disable the plugins from cPanel, follow these steps:
- Login to your cPanel dashboard and navigate to the File Manager option.
- Go to public_html > wp_content and find the plugins folder.
- Right-click on the plugins folder, then select “Rename,”. Now simply provide a new name.
#5. Verify the Impact
All plugins will be disabled at once if the plugins folder is renamed. You can follow the same steps to disable all WordPress themes on your site. Don’t deactivate plugins and themes at the same time since this will make debugging more difficult.
#6. Restore Pluigns Folder
Now, rename the plugin’s folder back to its original name after accessing the backend of your site. You will be able to manually activate each WordPress plugin from the admin area since all of them will stay inactive.
#7. Delete Problematic Themes or Plugins
To avoid the occurrence of the “Error Establishing a Database Connection” issue, don’t forget to remove the particular WordPress theme or plugin that caused it.
Establish a New Database
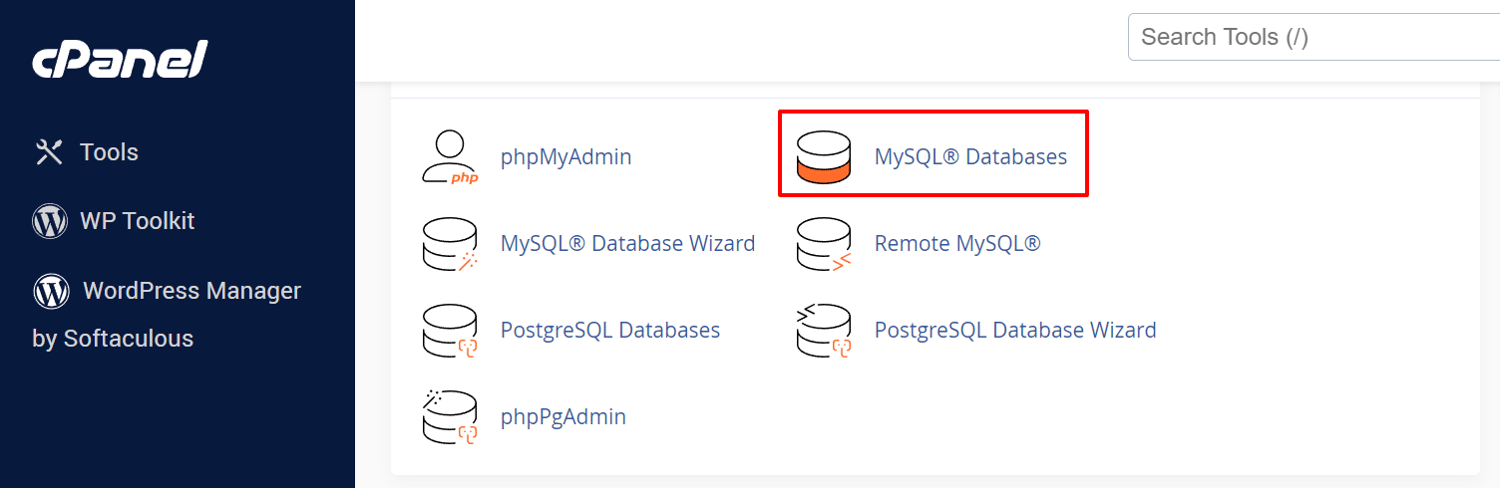
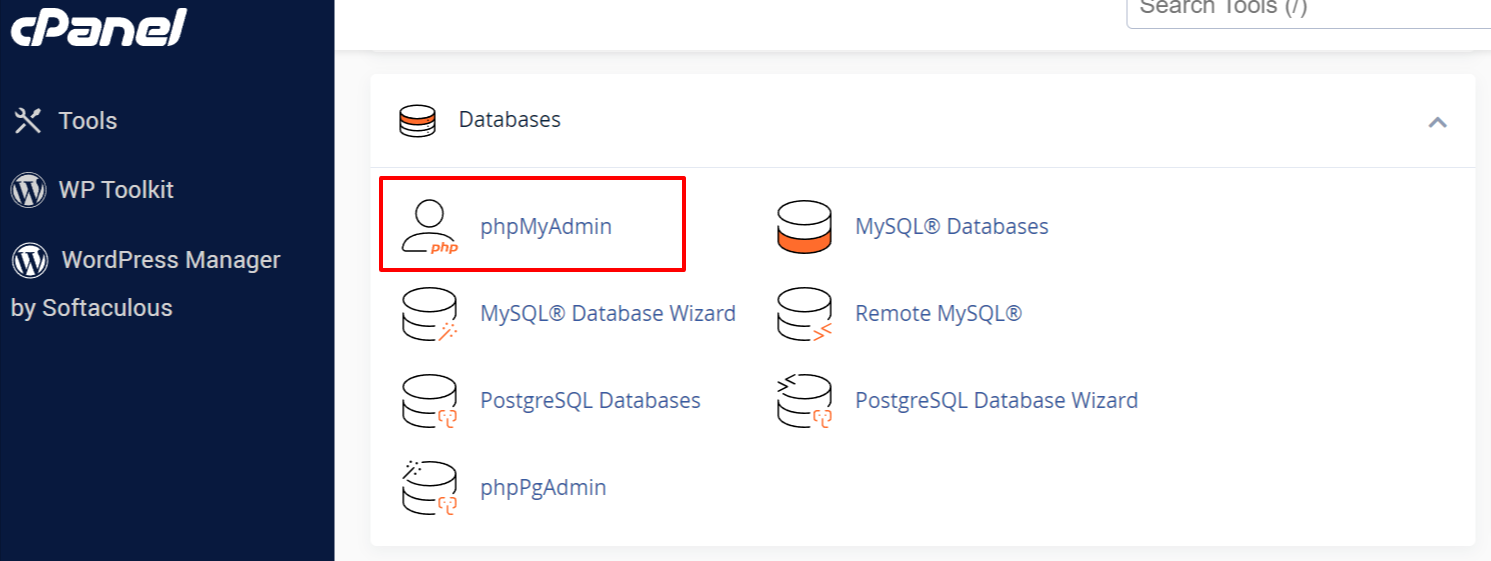
Your database is likely entirely damaged if you are still unable to fix the “Error Establishing a Database Connection” problem. In such circumstances, creating a new MySQL database is the best idea. So, go on with the following process of creating a new MySQL database using the cPanel:
Access MySQL Databases: First, log in to your cPanel, Go to Databases and click on MySQL Databases.
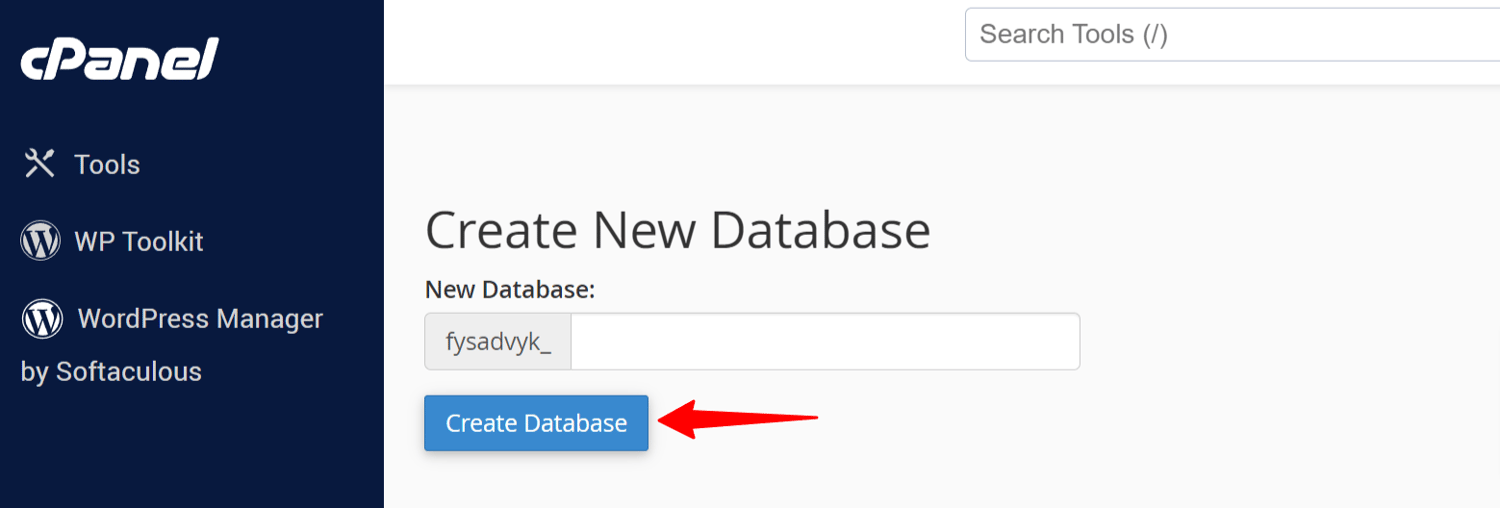
Create a New Database: Find the “Create New Database” section at the top of the page to begin creating a new database. After typing in the chosen database name, click “Create Database.”
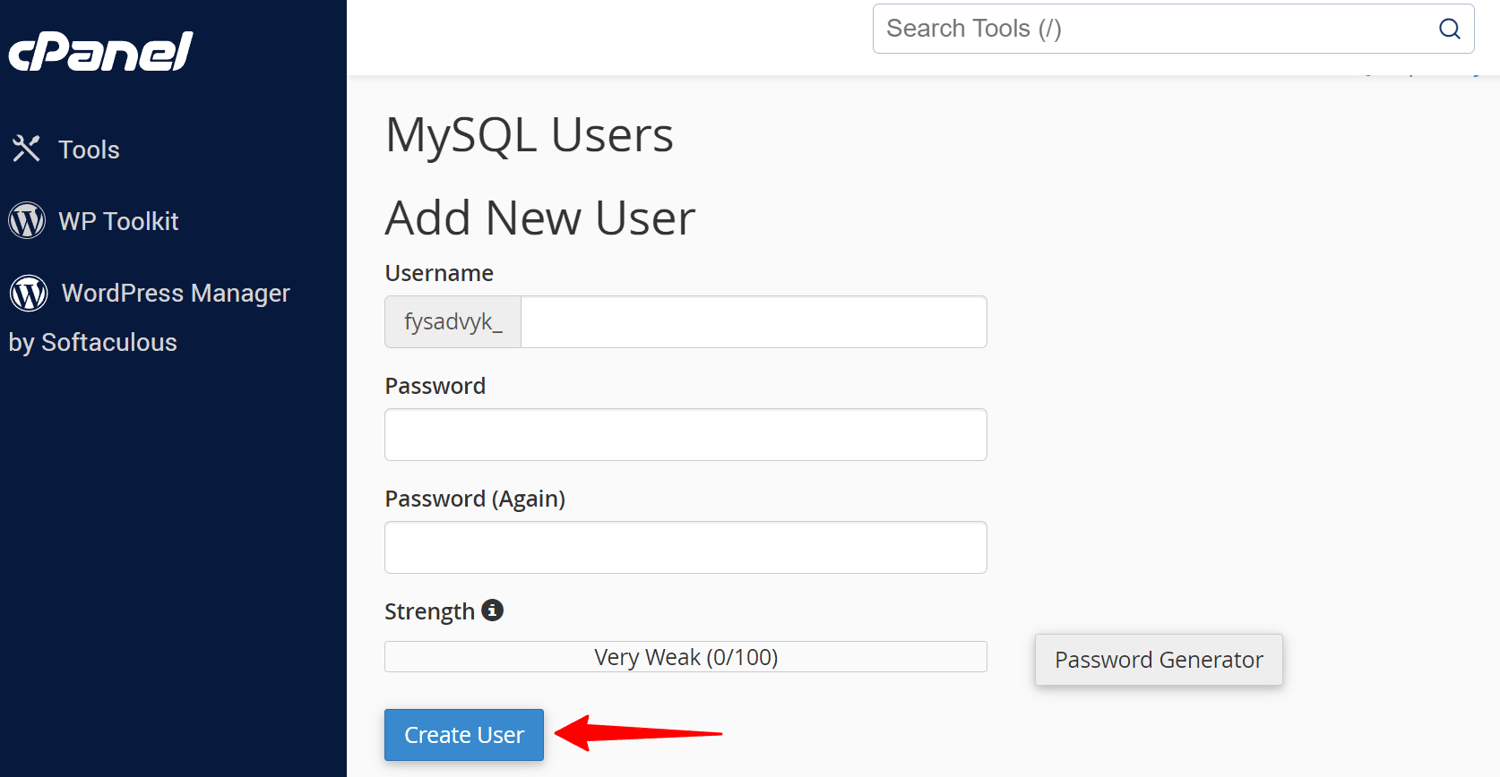
Create a New User: To create a new user in MySQL, enter the username and password in the MySQL Users section. Followed by clicking Create User to proceed.
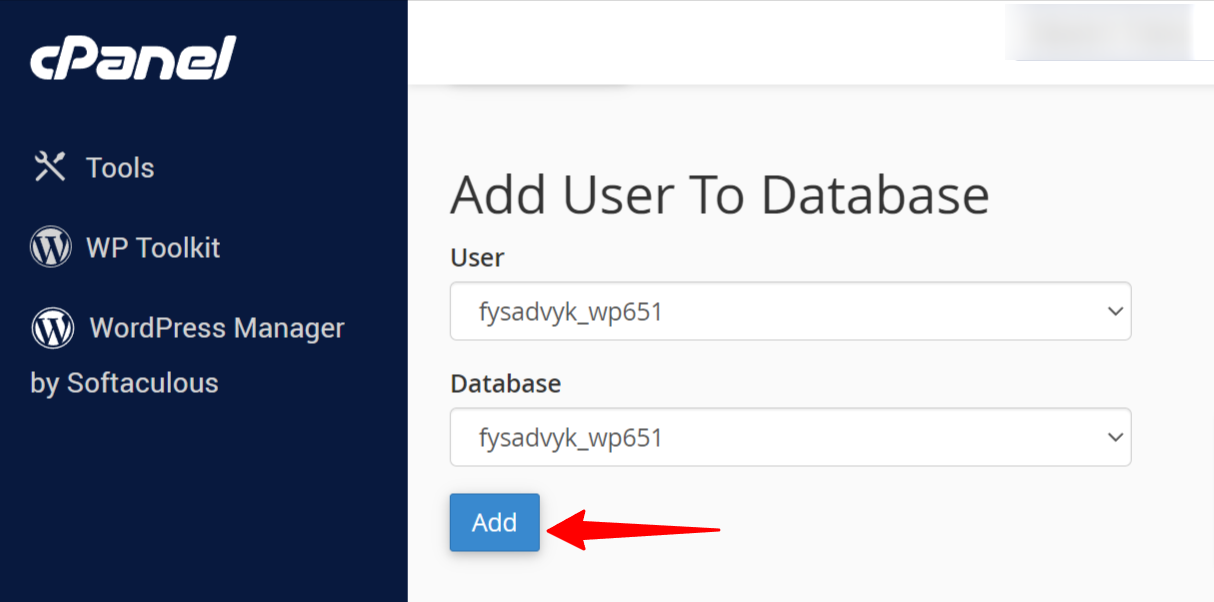
Assign a New User: Locate the Add User to the Database area by scrolling down. From the drop-down menu, choose the freshly created user and database, then click Add.
Fix Corrupted Database Tables: For repairing the corrupted database tables, you can use cPanel or phpMyAdmin.
- Use cPanel: In cPanel, you have options to inspect and fix your database under the Modify Databases area. Hence, select Repair Database to restore damaged tables.
- Use php MyAdmin: To access php MyAdmin, Go to Databases and click on phpMyAdmin. Then select your database name and check all the tables.

- Repair Database Tables: In phpMyAdmin, you need to select the Repair Table option located next to the Check All button. Consequently, the REPAIR_TABLE command will be executed to repair any damaged tables.
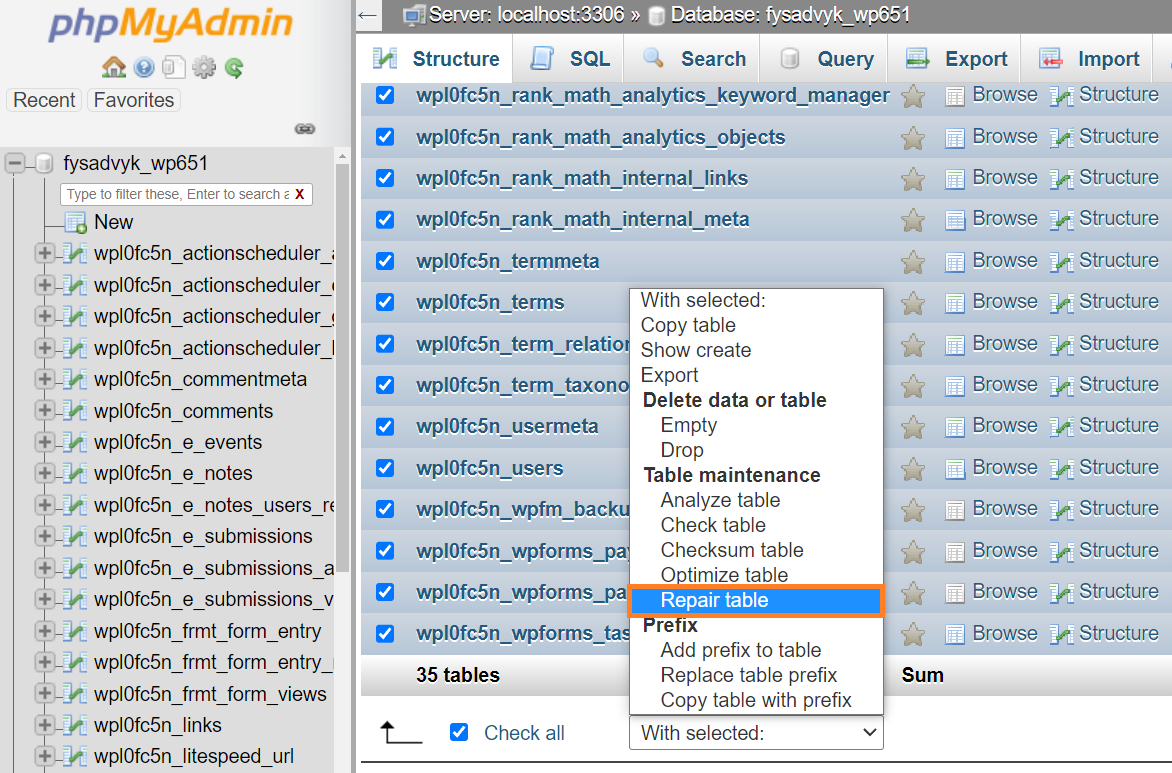
Patiently allow the repair process to finish, and then visit your WordPress. Now, check whether the “Error Establishing a Database Connection” warning is still there. If your problem still exists, let’s try out these additional methods that can also fix this issue.
Update WordPress Website URL
When it comes to moving your website to a new web server, you may need to update your WordPress URLs to point to the new domain. You can complete the procedure with the aid of this step-by-step manual.
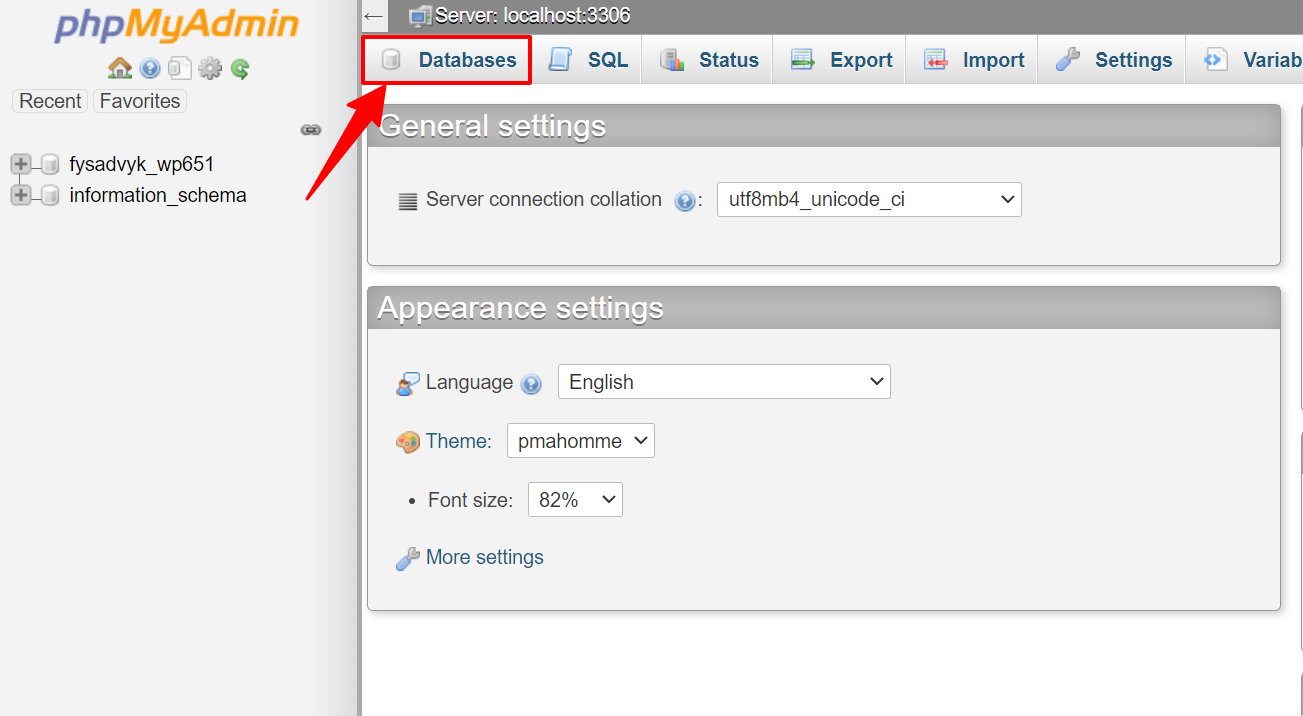
Access phpMyAdmin: Log into your hosting dashboard and find phpMyAdmin. With this tool, you will be allowed to manage your website’s database.
Open WordPress database: In phpMyAdmin, locate and choose your WordPress database. This step will grant you access to your database tables.
Navigate to the SQL Tab: After getting access to your WordPress database, find and click the SQL tab. Here, you will be able to execute SQL queries.
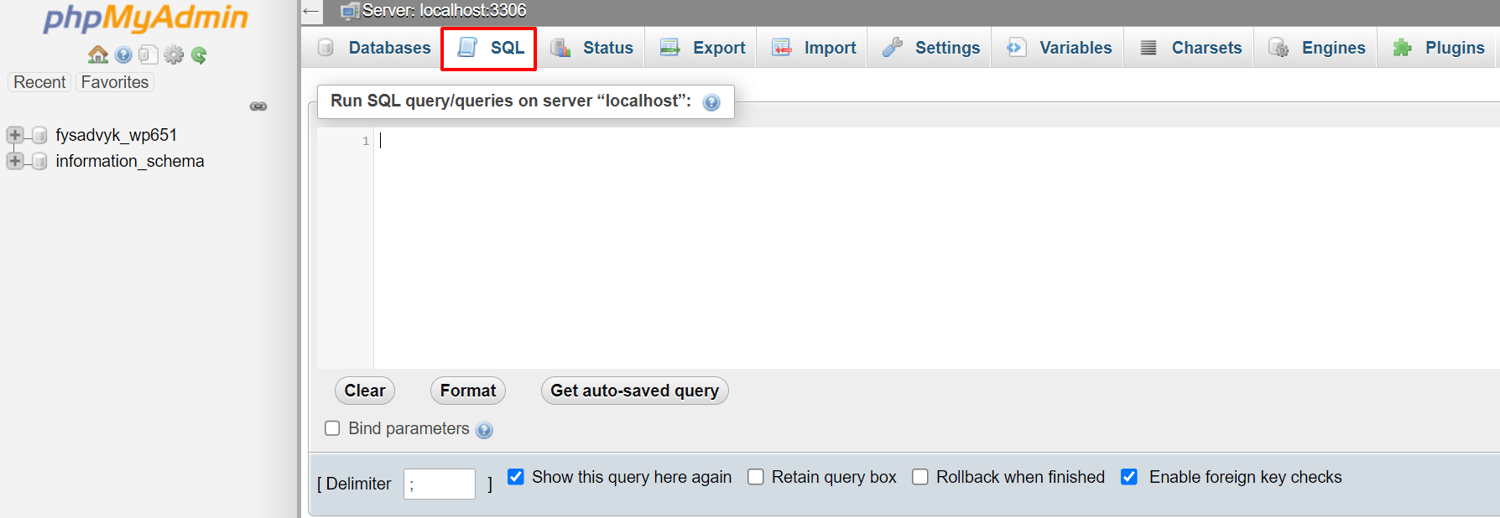
Copy & Paste the Code: Simply copy and paste the following code in the SQL field:
UPDATE wp_options SET option_value = replace(option_value, 'http://www.old-domain.com', 'http://www.new-domain.com') WHERE option_name = 'home' OR option_name = 'siteurl';
UPDATE wp_posts SET guid = replace(guid, 'http://www.old-domain.com','http://www.new-domain.com');
UPDATE wp_posts SET post_content = replace(post_content, 'http://www.old-domain.com', 'http://www.new-domain.com');
UPDATE wp_postmeta SET meta_value = replace(meta_value,'http://www.old-domain.com','http://www.new-domain.com');
Note: Don’t forget to replace the ‘http://www.old-domain.com’ with your previous website URL and ‘http://www.new-domain.com‘ with the new website URL.
Check and Execute the Query: Make sure that the codes are correct and updated with the old and new URLs. When you are done confirming, click the Go button to execute the SQL queries.
Reboot Your Web Server
You can simply reboot your server If you are using dedicated servers, local servers, or VPS (Virtual Private Servers). Your database-related error, along with other errors, can be resolved
By restarting the web and database servers. But this process requires a root account and SSH clients
Restore And Backup
Using a database backup and restoration procedure in certain circumstances may be a faster way to remedy the problem. Many web hosting provides their own backup and restoration processes. It’s crucial to remember that both the database and files need restoration.
Seek Assistance
We highly advise you to seek guidance from professionals when encountering issues and are unable to resolve them. Don’t hesitate to reach out to the customer support service of your hosting provider company for further regarding the database connection issue since they can lead you in the appropriate route and even resolve the error for you.
Final Words
If you are getting the “Error Establishing a Database Connection” error on your WordPress website, don’t get panicked. Of course, you have the risk of losing valuable visitors, but we’ve come up with this guide that will surely help you fix the issue within a few minutes. So, identify the exact reason behind the error and follow the guide to keep your site fully functional.
How to Fix the “406 Not Acceptable” Error on Your WordPress Site