We have many CSS properties, and mastering all can be a challenge. CSS visibility is one of the important properties that you should master if you want to become a skilled web developer.
In this article, I will define CSS Visibility, explain its importance, and list and explain the different CSS visibility values.
What is CSS Visibility?
CSS visibility property hides or shows an element in a web page. For instance, you can have four boxes on your web page and use the visibility property to determine how they will be displayed. All the elements will appear on the page if you set the visibility as visible.
However, if the element is hidden, it will still occupy space but will be hidden from the end browser/ screen.
CSS Visibility is important in the following cases;
- Visibility control: You can control what should be displayed based on the current user. You can set the visibility of an element to be only visible when a user triggers it using a certain action. For instance, a hover or clicking a button.
- Layout preservation: A good application should preserve its layout and contents irrespective of the screen size. When you set the visibility of an element as hidden, it will still occupy space but will not be visible to the end users. Such an approach makes it possible to maintain a consistent layout.
- Optimize performance: The browser does not need to keep on recalculating the layout when the visibility property is set as
visibility:hidden. However, when you use thedisplay:noneproperty, the browser needs to recalculate the layout whenever you decide to show the element again. - Create dynamic and interactive UI: You can combine CSS visibility property with other properties, such as opacity, to create fade effects, animations, and smooth transitions.
Different CSS visibility values
CSS visibility has five possible values. I will go into detail through code blocks and screenshots. If you intend to follow along,
- Create a folder on your local machine.
- Add two files;
index.htmlandstyles.css. - Open the project in your favourite code editor (I am using VS Code)
You can use this command;
mkdir -p CSS-visibility && cd CSS-visibility && touch index.html styles.cssThe next is to connect index.html and styles.css files. On the <head> section of the index.html file, add this;
<link rel="stylesheet" href="styles.css">You should now have something similar to this on your code editor;

Visible
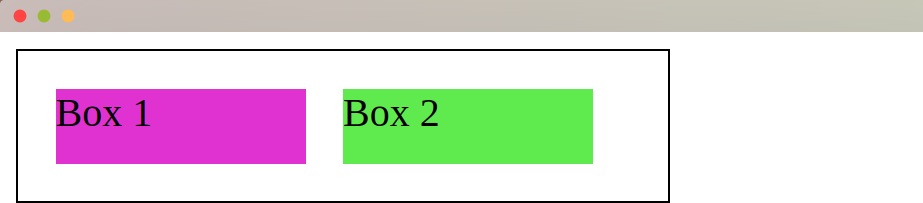
When you set the value of an element as visibility: visible, it will appear on the web page. This visibility is there by default. We can have three boxes in our HTML document to understand this concept better. In the <body> section of your index.html, add the following;
<div class="container">

      <div class="box1"> Box 1 </div>

      <div class="box2"> Box 2 </div>

      <div class="box3"> Box 3 </div>

    </div>
We can now style our divs (boxes) using the following CSS code;
.container {

    padding: 15px;

    width: max-content;

    display: flex;

    border: 1px solid black;

  }

  .box1,

  .box2,

  .box3 {

    height: 30px;

    width: 100px;

  }

  .box1 {

    background-color: rgb(224, 49, 209);

    margin-right: 15px;

  }

  .box2 {

    background-color: rgb(95, 234, 77);

    margin-right: 15px;

  }

  .box3 {

    background-color: rgb(154, 43, 12);

  }
When the final page is rendered, you will have something like this;

If you set the visibility on of the boxes as visibility: visible, It won’t have any effect as all boxes are visible by default.
However, we can demonstrate how visible property works using the display: none property on one of the boxes. We can select box3 as our example. Change the CSS code on class .box3 as follows;
.box3 {

    background-color: rgb(154, 43, 12);

    display: none

  }
When you re-render the page, you will note we only have two boxes, one and two.
If you are keen, you will note that our .container element has reduced size. When you use the display: none property, Box 3 is not rendered, and its space on our browser becomes vacant for other boxes to occupy.
Hidden
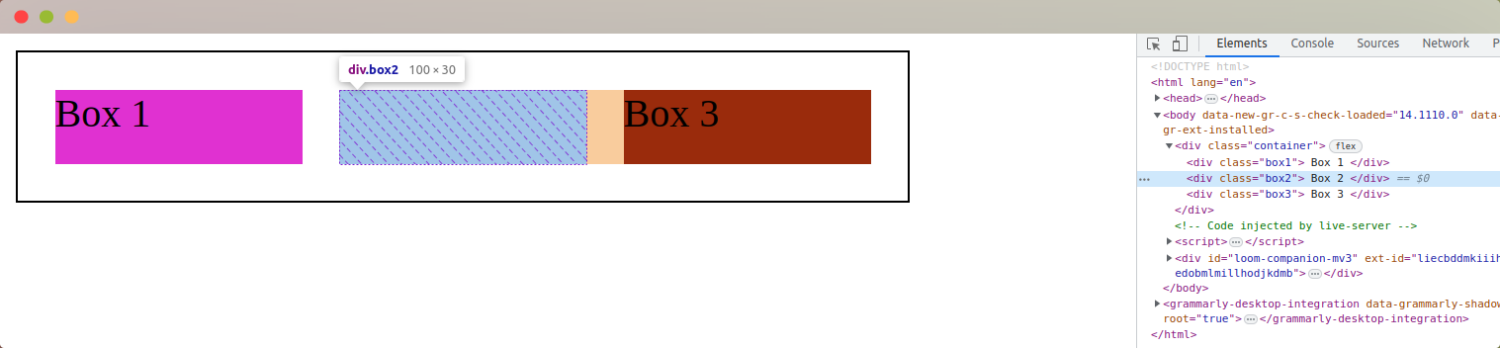
When we apply the visibility: hidden CSS property on an element, it will be hidden from the end user. However, it will still occupy space. For instance, we can hide Box2 using this property.
To achieve this, modify the Box2 CSS code as follows;
.box2 {

    background-color: rgb(95, 234, 77);

    margin-right: 15px;

    visibility: hidden

  }
The only change we have made is adding this line;
visibility: hiddenThe final page will be as displayed;

We can see a space between Box 1 and Box 3 as the Box 2 element is only hidden.
We can see that Box 2 is still on the DOM if we inspect our rendered page.
Collapse
Collapse is a visibility value that is used on sub-elements. HTML tables are a perfect example of where we can apply the visibility:collapse attribute.
We can add the following code to create a table in our HTML file;
<table>

        <tr>

          <th>Programming Language</th>

          <th>Framework</th>

        </tr>

        <tr>

          <td>JavaScript </td>

          <td>Angular </td>

        </tr>

        <tr class="hidden-row">

          <td>Ruby </td>

          <td>Ruby on Rails</td>

        </tr>

        <tr>

          <td>Python </td>

          <td>Django </td>

        </tr>

   </table>
We can now style our table with a border of 1px on all its cells. Add this to your CSS file;
table {

    border-collapse: collapse;

    width: 50%;

  }

  th, td {

    border: 1px solid black;

    padding: 8px;

  }
When we display the table, we will have the following;
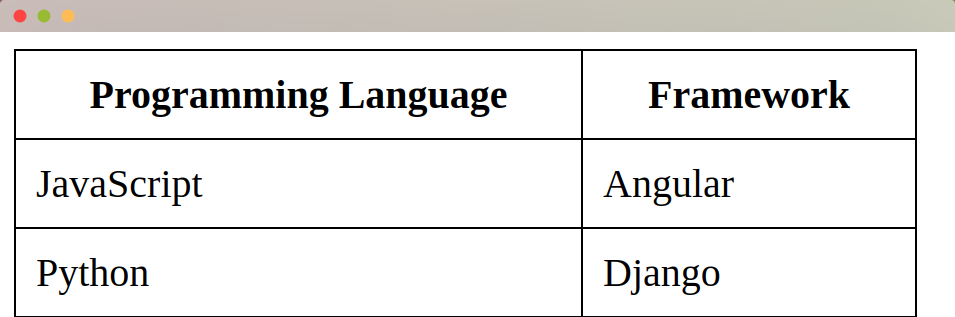
We will now hide the second row to demonstrate how the visibility: collapse attribute works. Add this to your CSS code;
.hidden-row {

    visibility: collapse;

  }
When the page is rendered, the row with Ruby and Ruby on Rails will be hidden.
Initial
The visibility: initial property resets an HTML element to its initial value. For instance;
- We started with all the rows in our table being displayed.
- We collapsed the value of row 2, thus hiding it.
- We can now go back to the initial value (display it)
We will add a button that switches between display and collapse values to demonstrate this.
Add this clickable button to your HTML code;
<button onclick="toggleVisibility()">Click Me!!</button>We can then add a JavaScript function that looks up for .hidden-row class and toggles the class .visible-row on it when the button is clicked.
<script>

    function toggleVisibility() {

      const hiddenRow = document.querySelector('.hidden-row');

      hiddenRow.classList.toggle('visible-row');

    }

  </script>

Add this code to your CSS file;

.visible-row {

    visibility: initial;

  }
The visibility value will switch back and forth as you click the button displayed;
Inherit
The visibility : inherit property allows a child element to inherit the display property from the parent.
We can have this simple code to demonstrate how this property works;
<h1>Inherit Demo</h1>

   <div style="visibility: hidden">

     <h2 style="visibility: inherit"> Hidden</h2>

   </div>

   <p>Visible (not inside a hidden element) </p>

 </p>
Only the content inside the h1 and paragraph tags will be displayed if you render the page. However, a space representing the hidden elements between the <h1> and <p> tags will exist.
We have one div whose visibility we have set as hidden. We have <h2> tag inside the div. We have set the visibility of the <h2> as inherit, which means it inherits from its parent, the div.

However, if we set the property of the div as visible, the <h2> (its child) will also inherit that.
<h>Inherit Demo</h>

    <div style="visibility: visible">

      <h2 style="visibility: inherit"> Hidden</h2>

    </div>

    <p>Visible (not inside a hidden element) </p>
The major difference between display:none and visibility:hidden is that the former removes an element from the layout entirely while the latter hides an element but still takes up space.
We can use this code to demonstrate the difference between the two;
<!DOCTYPE html>
<html>
<head>
<style>
.box {
display: inline-block;
width: 100px;
height: 100px;
background-color: lightgray;
margin-right: 20px;
}
.box1 {
background-color: lightblue;
}
.box2 {
background-color: black;
}
.container {
padding: 10px;
border :2px solid black;
padding-left: 20px;
width: 250px;
}
</style>
</head>
<body>
<div class="container">
<div class="box box1"></div>
<div class="box box2"></div>
</div>
</body>
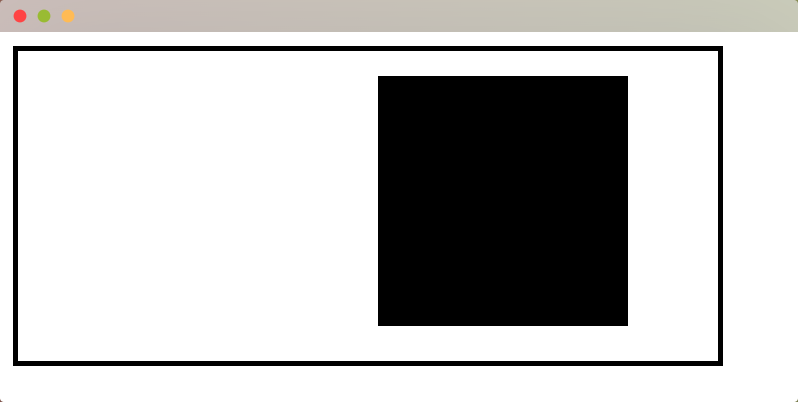
</html>If we render our page, we will have two boxes side by side;

The display: none demo
Add this to .box1 class;
display: none;When you render the page, you will note that .box1 will no longer be displayed. The second box (black) also moves to the left to occupy the space previously occupied by the lightblue box.

The visibility: hidden demo
Instead of display: none, add this .box1 class;
visibility: hiddenThis property leaves some space for box1 but does not display it. On the other hand, box2 remains in its place.
| display:none | visibility:hidden |
| Removes an element from the web page entirely | Hides an HTML element but still takes up space on the web page |
| You can style an element whose display is set to none | You can position and style an element whose visibility is hidden |
| Not accessible by screen readers | You can access an element whose visibility is set as hidden using screen readers |
Improve Accessibility with CSS Visibility
You can use CSS visibility to hide elements that are not important to all users. For instance, you can use this feature to hide a login user that will only be available to users who are not logged in. You can also have a sidebar or a footer containing terms of service or copyright information.
We can have this code to illustrate how you can improve visibility;
<!DOCTYPE html>

<html>

  <head>

    <title>Homepage</title>

    <style>

      .login-form {

        display: none;

      }

      .login-text:hover + .login-form {

        display: block;

      }

      .login-form label {

        display: block;

        margin-bottom: 5px;

      }

      .login-form input {

        width: 30%;

        margin-bottom: 10px;

      }

    </style>

  </head>

  <body>

    <p class="login-text">Login</p>

    <form class="login-form">

      <label for="username">Username:</label>

      <input type="text" id="username" name="username" required />

      <label for="password">Password:</label>

      <input type="password" id="password" name="password" required />

      <button type="submit">Submit</button>

    </form>

  </body>

</html>
The login form only becomes visible when you hover over the first item.
Conclusion
We believe you can now comfortably use the CSS visibility property in your code to make smooth transitions and improve the accessibility of your web pages. However, you must know where to use every visibility value to avoid ending up with clanky pages. You may also hide crucial data from the end users when you misuse the CSS visibility property.
Check out our CSS guides and resources to learn more about CSS properties you can combine with CSS visibility.