Windows and Linux are the two most popular operating systems (OS). Windows offers a user-friendly approach, but Linux’s high customizability makes it a top pick for developers, productive people, and learners.
You need virtualization within Windows or a dual boot to access them together.
However, there is a new Windows feature that lets you effortlessly access Linux in Windows.
Meet WSL2 – the Windows Subsystem for Linux comes in. It is a Windows feature that lets you access Linux in Windows.
This article will focus on WSL2. We’ll cover it in great detail, its definition, purpose, installation process, and how to use it effectively.
Let’s get started.
What is Windows Subsystem for Linux?
Windows Subsystem for Linux lets you access GNU/Linux environment directly from Window’s terminal, removing the need to dual-boot or use virtualization tools. With it, you can access the Linux kernel. This means you can use Linux features directly from Windows, including command-line tools, applications, and utilities.
WSL 2 is the latest Windows subsystem offering better features and speed than WSL1 (launched with Windows 10). Also, most Windows installations come pre-installed with WSL. To use it, you need to enable it.
Under the hood, WSL2 uses Window’s Hyper-V virtual machine technology. This makes WSL2 Linux compatible, resulting in almost 20x faster execution speeds than WSL1.
In short, WSL2 is the latest Windows Subsystem for Linux, giving Windows users like you direct access to the Linux kernel.
Getting Started with WSL2
Throughout our tutorial, we will also use Windows Terminal, a handy but recommended option to work with terminals in Windows. It is a modern, fast, and efficient terminal for users who want to work with command-line tools and WSL.
PC Requirements
Not all PCs can run WSL2. Your system must support virtualization to run WSL2. That’s because WSL2 uses Hyper-V under the hood.
You must also use a 64-bit CPU with SLAT(Second Level Address Translation) support. Almost all modern CPUs support it.
As for disk space, you need at least 1 GB of free space.
Enabling Virtualization from BIOS
If you meet the hardware requirements, you must enable it from the motherboard’s BIOS.
Enter the BIOS by pressing keyboard keys such as F2, Del, or F10.
In the BIOS, you must find and enable AMD’s Secure Virtual Machines (SVM)/Intel’s Virtualization Technology VTx. Once done, reboot the machine.
If you need more clarification, check out the detailed instructions in my other post, How to Install Ubuntu on Windows 10 using Hyper-V.
Enabling Windows Features for WSL2
With the hardware requirements met, it is now time to enable WSL2 from Windows.
The first step is to check your Windows version. This will help us know whether your Windows support WSL or not.
To do so, press CMD + R on your keyboard and type “winver.” It’ll show your Windows version.
If you’re using Windows 10, you’re probably using WSL1. However, for most Windows 11 users, it is WSL2.
All Windows 10 and 11 version support WSL2, except Windows S, as it is aimed at security and has virtualization disabled.
If you’re using Windows S, you must change to another version, such as Windows Home or Pro.
To do so, go to Settings > Update & Security > Activation to change your OS.
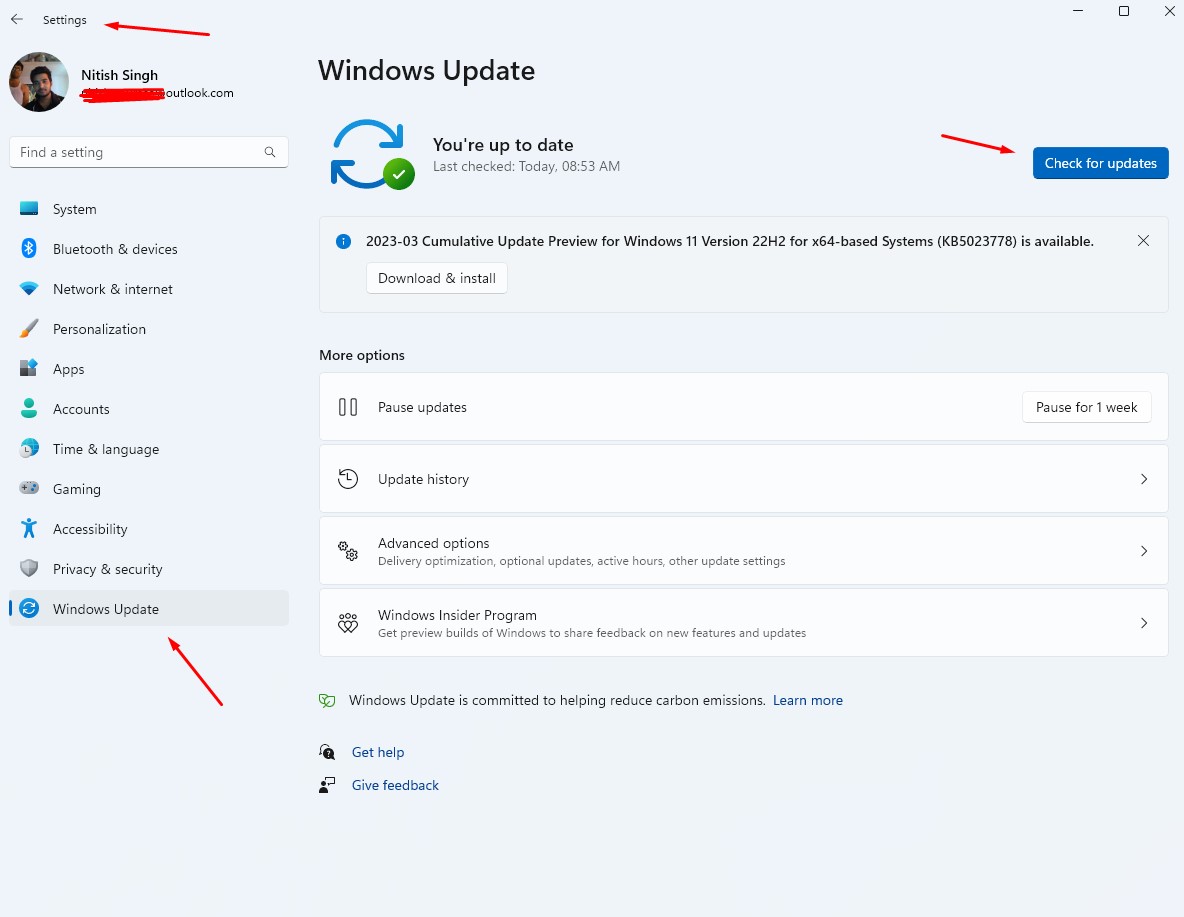
Also, you must have the latest Windows update installed. It’ll ensure complete compatibility and support for WSL2. To update your system go to Settings > Windows Update.
To use WSL2, you need to enable multiple Windows features.
Go to Control Panel > Programs and Features. Under it, you’ll find “Turn Windows features on or off.” Click on it, and a new window, “Windows Features,” will open.
There, search for “Hyper-V,” “Virtual Machine Platform,” and “Windows Subsystem for Linux.”
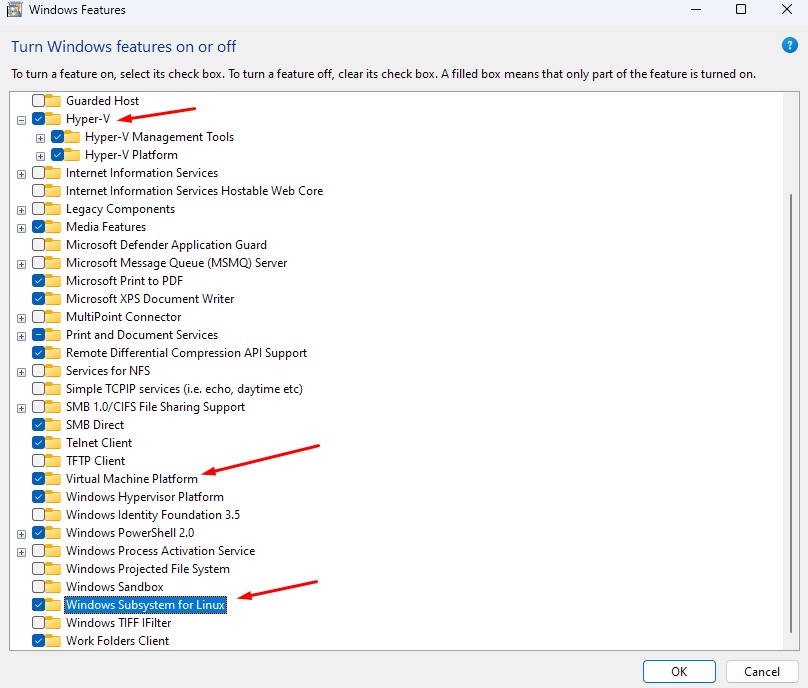
It’ll then ask for a reboot for the changes to take effect.
You can also enable it by running the following command.
$ dism.exe /online /enable-feature /featurename:Microsoft-Windows-Subsystem-Linux /all /norestart

$ dism.exe /online /enable-feature /featurename:VirtualMachinePlatform /all /norestart
Installing WSL2
With all pre-requisite covered, it is now time to install WSL.
Open the Windows Terminal (Windows 10) or Windows PowerShell (Windows 11), then type the following command.
$ wsl#output
Copyright (c) Microsoft Corporation. All rights reserved.

Usage: wsl.exe [Argument]

Arguments:
…..
This means WSL is available but not activated.
Now, to install WSL, run the following command with administrator privileges.
$ wsl --install#output
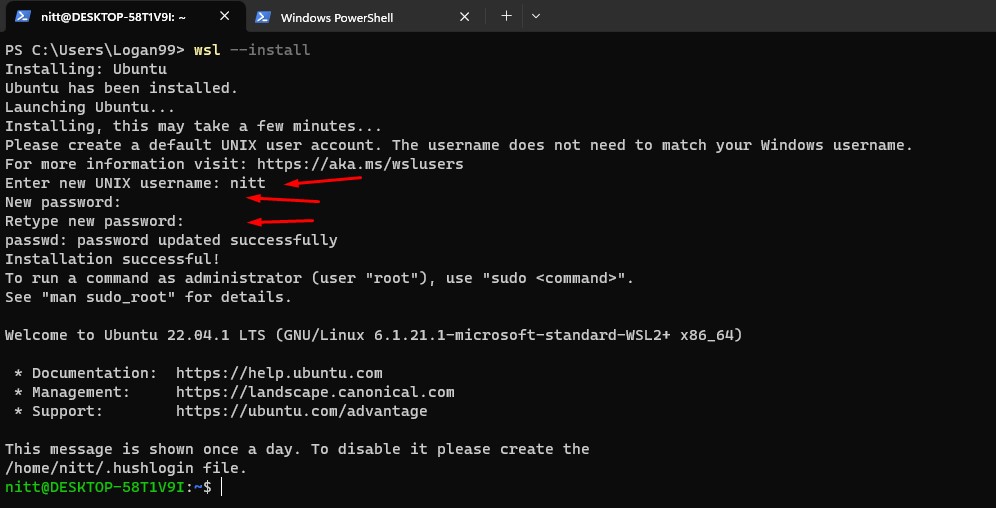
PS C:\Users\Logan99> wsl --install

Installing: Virtual Machine Platform
Virtual Machine Platform has been installed.
Installing: Windows Subsystem for Linux
Windows Subsystem for Linux has been installed.
Installing: Ubuntu
Ubuntu has been installed.
The requested operation is successful. Changes will not be effective until the system is rebooted.
Note: You may not see this, considering you enabled them through Windows Features. Instead, you should get the following output. (If you do, jump to the next section).
Ubuntu is already installed.
Launching Ubuntu...
Installing, this may take a few minutes...
Please create a default UNIX user account. The username does not need to match your Windows username.
For more information visit: https://aka.ms/wslusers
Enter new UNIX username:
New password:
Retype new password:
To check the WSL version, type wsl –version command.
$ wsl --version#output
WSL version: 1.1.6.0

Kernel version: 5.15.90.1

WSLg version: 1.0.50

MSRDC version: 1.2.3770

Direct3D version: 1.608.2-61064218

DXCore version: 10.0.25131.1002-220531-1700.rs-onecore-base2-hyp

Windows version: 10.0.22621.1413
As you’ll notice, then WSL version 1.1.6.0 already comes pre-installed. So if it doesn’t work and outputs an error, WSL is not installed.
To change to WSL2, run the following command.
$ wsl --set-default-version 2As our system has WSL already pre-installed, we get this message.
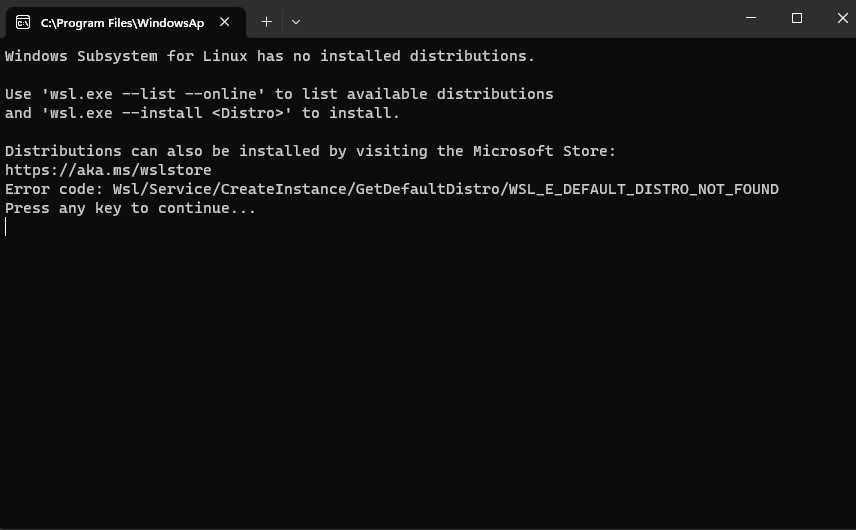
You can also install WSL from the Windows Store. First, open the Store and search “Windows Subsystem for Linux.”

Click on “Get.” and wait for it to install.
Once installed, you can click on “Open,” it’ll open a Windows Terminal with the message, “Windows Subsystem for Linux has no installed distributions.”
Installing Distribution on WSL
With WSL installed, it is time to install Linux distributions.
By default, WSL installs the Ubuntu LTS version. To do so, you need to run the following command.
$ wsl --installIt’ll start installing Ubuntu. It’ll ask you to set a new UNIX username and password during the installation.
You’ll get a Ubuntu Linux prompt when the installation is complete. Here, you can use all Linux commands. Let’s check the Ubuntu version.
$ lsb_release -a#output
No LSB modules are available.

Distributor ID: Ubuntu

Description:    Ubuntu 22.04.1 LTS

Release:        22.04

Codename:       jammy
That’s it! You now have access to the Linux kernel.
To exit the distribution, you need to type the following command.
$ exit#output
nitt@DESKTOP-58T1V9I:/mnt/c/Users/Logan99$ exit

logout
Installing More Distros
Similarly, you can install other distros like Fedora, Debian, and OracleLinux_8_5. To see the available distro options, type the following command.
$ wsl --list --online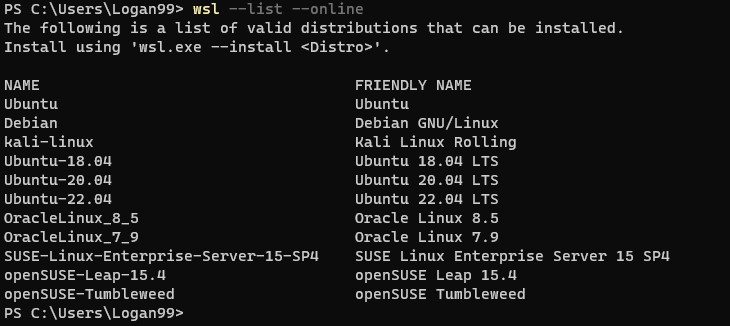
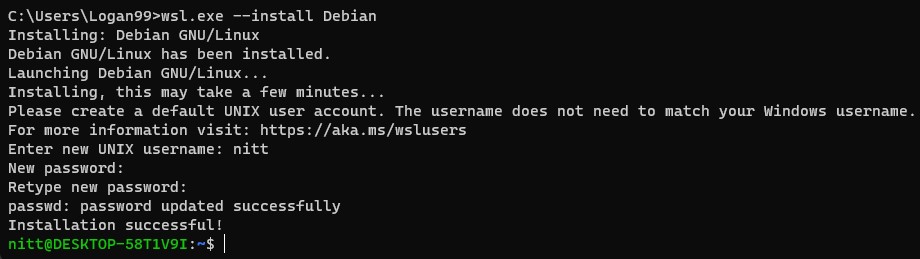
To install Debian, we’ll need to type the following command.
$ wsl --install -d Debian

Or

$ wsl.exe --install Debian
Like Ubuntu, it’ll also ask you to install a username and password.
#output
Now, let’s check the Debian version.
$ cat /etc/issue#output
$ Debian GNU/Linux 11 \n \lBut what about Fedora? It is not listed when you use the wsl –list –online command.
Well, you can install distros from the Windows store as well.
Open the Windows Store, and type Linux distros; it’ll list all the available ones. Here, you can see only the official supported distros.

For unofficial distro support, you need to search manually. However, these unofficial distros can be buggy and not 100% secure. So, only use it for experimental purposes.
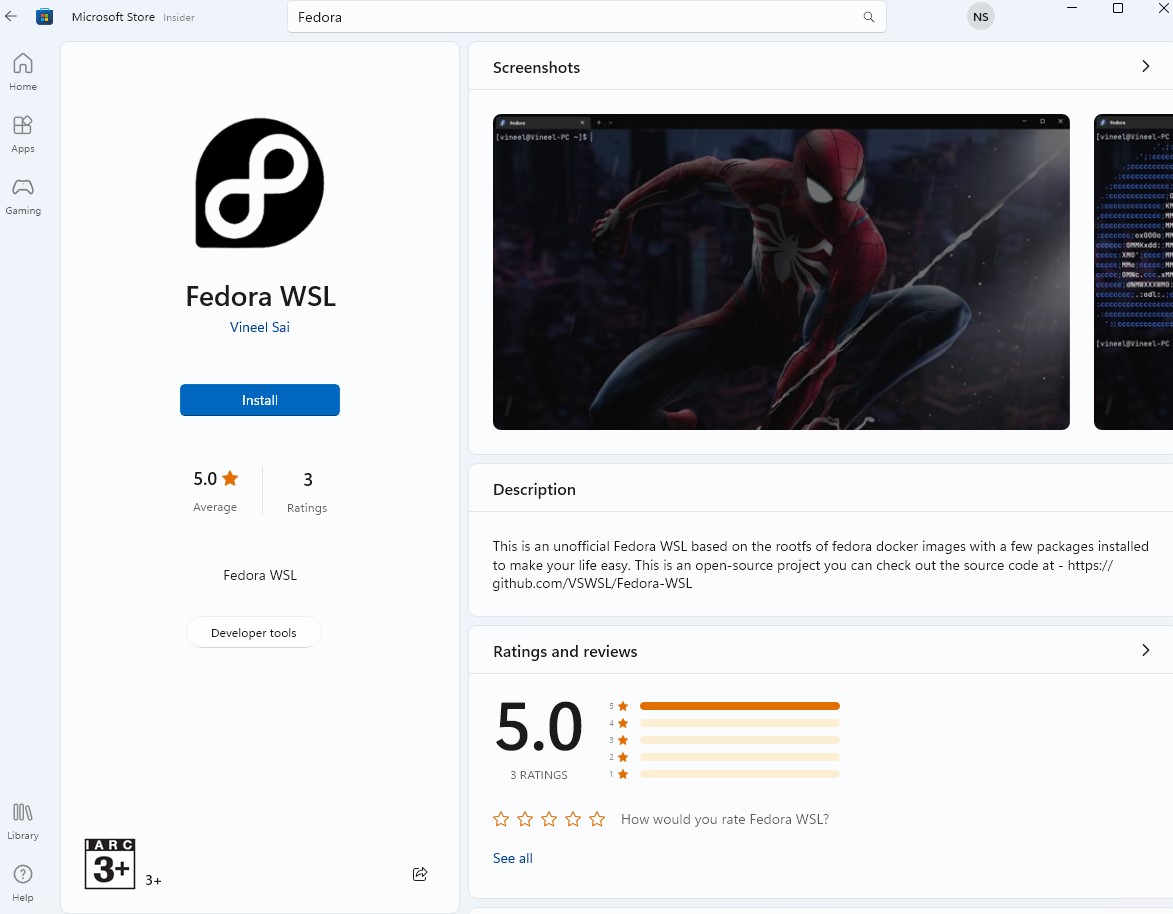
Click on “Install” to make it available on your system.
Setting Default Distro
If you want to see the list of available distros, you can list them with the following command.
$ wsl --list
The “Default” keyword around Ubuntu means the default Linux distro launches when you type “wsl” in the command prompt.
To change the default distro, type the following command.
$ wsl --setdefault <DistroName>So, to set Debian as our default distro, we need to type the following command.
$ wsl --setdefault Debian
So, the next time you type wsl in the terminal, you’ll launch Debian.
Switching the WSL Version for the Distro
By default, distros use WSL2. To list your current installed distros and their WSL version, type the following command.
$ wsl --list --verbose#output
NAME      STATE           VERSION

* Ubuntu    Stopped         2

  Debian    Stopped         2
Here, the * refers to the default Linux installation.
Now, to change the WSL version from 2 to 1, type:
$ wsl --set-version Ubuntu 1And, if you want to switch back to 2 from 1, type:
$ wsl --set-vesion Ubuntu 2Note: It may take some time for the conversion to take place. During the conversion, do not close the window.

Launching Particular Distros With Different Usernames
What if you want to launch a particular distro? To do so, you need to type the following command.
$ wsl -d <DistroName>

Or

$ wsl --distribution <DistroName>
To launch Ubuntu, type:
$ wsl -d UbuntuIf you want to launch it with a particular user name, you need to add –user followed by the user name.
$ wsl -d <DistroName> --user <UserName>For example, to launch Debian with a “root” username.
$ wsl -d Debian --user rootNote: Launching the distro with a non-existent user will get an error, “User not found.”
Update Linux
You can update your Linux distro by typing the following command:
$ sudo apt update

$ sudo apt upgrade
Moreover, you can also look for Linux kernel updates for WSL:
$ wsl --updateSetting up Visual Studio Code with WSL2
You can also set up VS Code to work with WSL. This way, you can access the WSL terminal directly from the VS Code. It can help you develop applications on Linux-based applications while accessing Linux-specific utilities and toolchains.
Moreover, you can also have access to Windows-specific productivity tools while taking advantage of VS Code features.
To make it work, you must install the Remote Development extension pack. You can also search for it directly from the VS Code by searching for its name from the extension tab.

If you’re working locally, you can set it up by going to the VS Code menu. From there, choose View > Terminal.
It’ll open the terminal. You’ll find the > symbol next to the “+” symbol. Click on it, and you’ll find the WSL terminals listed.
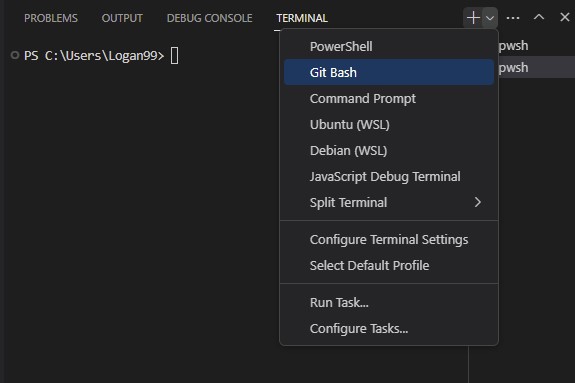
Here, you can also select “Default Profile.”
This is possible because VS Code can directly access \\wsl$\ and any debuggers running on localhost.
Working with Graphical Applications and WSL2
To work with graphical applications, you must install the correct drivers for the WSL2. Intel, AMD, and Nvidia offer a driver for WSL so that Linux-based graphic applications can work smoothly.
However, you’ll still find issues with this approach. First of all, these graphical apps may have some non-working features. Also, many apps may not work, leaving you to look for alternatives.
In short, it is primarily a trial-and-error method, where you may spend too much time.
You can check their WSL2 guide on working with graphical applications using Ubuntu.
Docker Desktop WSL2 on Windows
If you don’t want to set up locally using Hyper-V, you can use Docker Desktop, which officially supports WSL2. With it, you can set up a faster workflow to use Docker tools directly on Windows. To learn more, check out the guide here.
Why is Microsoft Taking Linux Seriously?
Microsoft is a proprietary company. It creates solutions like Windows in a closed environment and wants users to stick to Windows rather than Linux.
However, in 2016, they announced a commitment to Open Source. The view changed in early 2001 when Steve Ballmer called Linux a “cancer.”
In 2023, things changed. Microsoft adopts Linux directly into its ecosystem. They announced WSL2 in May 2019 and introduced WSL2 in October 2021 to the Windows Store. They also released WSL2 v1.0 on Nov 2022.
They have also made Microsoft software such as Edge and Teams accessible to Linux users. They’re also actively contributing to the Linux kernel and a product member of the Linux Foundation.
All of these hints at Microsoft taking Linux seriously. However, some skeptics don’t think Microsoft loves Linux.
In short, Microsoft is interested in Linux. Their Window subsystem is proof that they care about Linux and open source. But, most importantly, it tells us that they want their users to have seamless access to the Linux kernel without the need to use virtualization or do a dual-boot to a Linux operating system.
Final Words
In the era of “which OS is best for developers,” developers can choose a path to access both. WSL2 provides access to Linux Kernel through different Linux distros. In addition, it is fast and works with Docker.
Currently, WSL2 is in active development, solving compatibility issues and giving more power to the developers’ hands. Thus, we can say the future looks bright with WSL2, and Microsoft is taking every step to make the Linux kernel accessible to its Windows users.
Next, check out Linux distros to know as a sysadmin and developer.