Building for the web is always an exciting prospect. It allows developers to have their path to build web applications. They can choose the framework, technology, tools, and philosophy they want to use.
One such philosophy is Jamstack. It offers a flexible approach to solving the web development problem.
In this article, you’ll learn how to build your first Jamstack app. Let’s get started.
What is Jamstack?
Jamstack is one of the new web philosophies to build things for the web. Technically, it offers developers a composable web architecture. You can choose your frameworks and tools to accomplish the same goal.
If you look closely,
Jam + stack = JAMstack.
Jamstack constitutes of three main components:
- J for JavaScript
- A for Application Programming Interface (API)
- M for Markup
This approach separates the business logic from the data, decoupling the web experience layer. The benefits include:
- Faster loading time (almost instant).
- A flexible and rapid development workflow.
- Improved scalability & maintainability.
To read more about Jamstack, check out Jamstack for Newbies.
History of Jamstack
Jamstack is relatively new. In 2016, Matt Biilmann introduced Jamstack in the company’s presentation, showing the world how to build a website without going the traditional route.
The solution separates the application logic from backend server dependence. So, most content is served through static files with CDNs—dynamic features supported and accessed via APIs. And, if any dynamic actions need to be processed by the server, it is compiled and pushed to CDNs, before being accessed by the end-user.
To better understand Jamstack history, we must look at static and dynamic websites.
- Static website: A static website is hosted on the server but has no dynamic aspects. During the initial era of the Internet, most sites were static websites that served HTML, CSS, and images stored on a server. The approach is fast as the server doesn’t have to spend any time processing the user’s request and always has the files ready. However, no ability to change anything leads to no interactivity.
- Dynamic website: Dynamic sites offer interactivity by processing users’ requests and generating the required HTML to serve. The approach is slow but adds the benefits of interactivity. Most modern sites are dynamic sites. The best example would be WordPress-powered websites.
And, then, we have Jamstack websites. Let’s learn how it solved the problem of both static and dynamic sites.
Jamstack Websites: How Do They Work?
Jamstack solves two core problems:
- Dynamic site’s slow loading time
- Static sites interactivity
A Jamstack site serves static files, which is fast. But it also contains JavaScript, which can interact with APIs to serve dynamic content.
Behind the scenes, you’ll need a static site generator to do the heavy lifting of creating static web pages.
These static website generators use Markdown to serve static websites. The static site generator generates static files from the available HTML, CSS, and JavaScript files. Once developed, the static site is then served through CDNs.
As you’re serving static files, the sites are loaded almost instantly. However, to add a dynamic aspect to the site, you need to rely on JavaScript. The JavaScript files can connect to APIs and add dynamic data by communicating with a database.
Building the First Jamstack Website
As Jamtack offers freedom, you can choose any Jamstack framework/static site generator, including Hugo, Gatsby, Next.js, Hexo, and others.
Also read: Best Frameworks for JamStack
And for deployment, you can deploy it to GitHub Pages, Netlify, Azure Static Web Apps, and others.
We will use Hugo for Jamstack development and Netlify to host our site for this tutorial.
The tutorial assumes you have a basic understanding of the web. You must know how the web works. In addition, you should also know how to use Git.
Let’s get started.
#1. Installing Pre-requisites: Go and Git
To install Hugo, you need two things: Git and Go. We need Git to streamline our build workflow (you’ll see it later with Netlify). Go is required as Hugo is built on it.
We’re using Ubuntu running on WSL 2 on Windows 11. We’re accessing the Ubuntu kernel directly from Windows.
Also read: Windows 11 Meets Linux: A Deep Dive into WSL2 Capabilities
You can choose an operating system, Windows, Linux, or Mac.
Installing Git
In Ubuntu, you can install Git by running the following command.
$ sudo apt update

$ sudo apt install git
In the case of Windows, you’ll need to download Windows binary installers. Check out our complete Git installation guide.
To verify if Git is installed correctly, type the following command.
nitt@logan99:~$ git --version

git version 2.34.1
Installing Go
Now, it’s time to install Golang. To do so, you need to run a few commands on Linux. So let’s do it in steps.
Step 1: Remove the previous Go installation and create a local Go tree.
$ rm -rf /usr/local/go && tar -C /usr/local -xzf go1.20.4.linux-amd64.tar.gzStep 2: Customizing PATH environment variable
export PATH=$PATH:/usr/local/go/bi
Step 3: Finally, check if Golang is installed correctly.
$ go version.

#output
go version go1.18.1 linux/amd64
Awesome, now we’re ready to install Hugo!
Installing Hugo
Depending on if you’re using Homebrew or Chocolately, you’ll need to use one of the following commands.
For Homebrew:
$ brew install hugoFor Chocolatey:
$ brew install hugo -confirmAnd, if you don’t use any of them, you can install them directly from the source.
$ mkdir $HOME/src

cd $HOME/src

git clone https://github.com/gohugoio/hugo.git

cd hugo

go install  --tags extended
To check if Hugo is installed successfully, run the following command.
$ hugo -versionStart building sites …
hugo v0.92.2+extended linux/amd64 BuildDate=2023-01-31T11:11:57Z VendorInfo=ubuntu:0.92.2-1ubuntu0.1
INFO 2023/05/05 12:20:38 syncing static files to /home/nitt/geekflare/public/
| EN
-------------------+-----
Pages | 35
Paginator pages | 0
Non-page files | 0
Static files | 23
Processed images | 0
Aliases | 0
Sitemaps | 1
Cleaned | 0
Total in 117 ms#2. Creating a Hugo Site
Hugo offers an easy way to create a site. To do so, run the following command.
$ hugo new site geekflare-jamstackCongratulations! Your new Hugo site is created in /home/nitt/geekflare-jamstack.
Just a few more steps and you're ready to go:
1. Download a theme into the same-named folder.
Choose a theme from https://themes.gohugo.io/ or
create your own with the "hugo new theme <THEMENAME>" command.
2. Perhaps you want to add some content. You can add single files
with "hugo new <SECTIONNAME>/<FILENAME>.<FORMAT>".
3. Start the built-in live server via "hugo server".
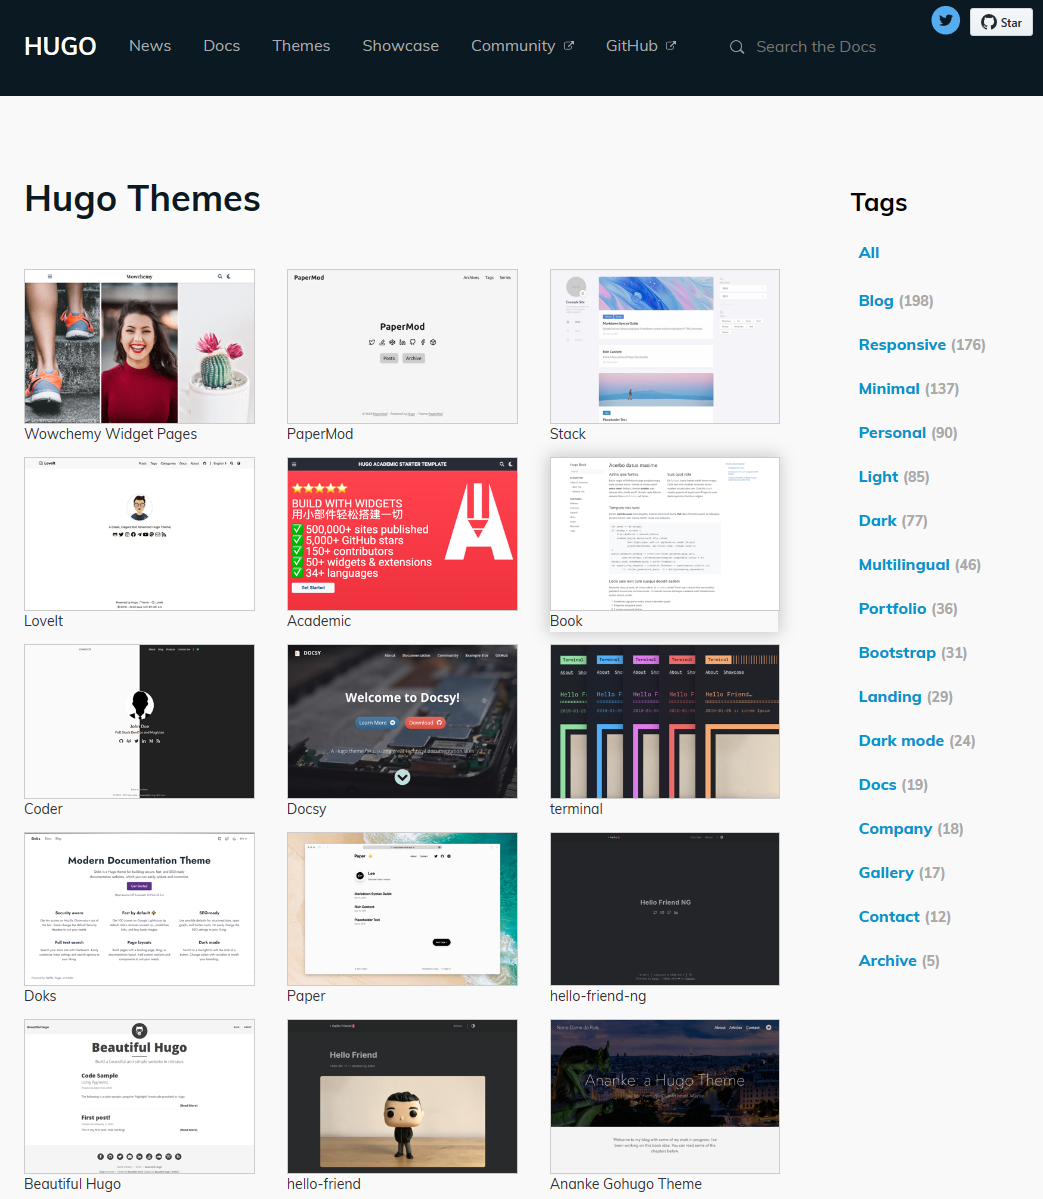
Visit https://gohugo.io/ for quickstart guide and full documentation.#3. Choosing a Hugo Theme
Hugo offers access to tons of themes. These themes provide a starting point for your project. And, to build a Jamstack site with Hugo, you need a theme.
#4. Creating a Small Business Site With Jamstack
For the tutorial, we’re going to use the Hugo Hero Theme. This multi-purpose theme offers features like full-width sections and portfolio creation through Markdown.

To install the theme, copy its repo link and clone it. Before proceeding, make sure that you’re in the root directory.
git clone https://github.com/zerostaticthemes/hugo-hero-theme.git themes/hugo-hero-theme#output
Cloning into 'themes/hugo-hero-theme'...
remote: Enumerating objects: 1141, done.
remote: Total 1141 (delta 0), reused 0 (delta 0), pack-reused 1141
Receiving objects: 100% (1141/1141), 28.17 MiB | 58.00 KiB/s, done.
Resolving deltas: 100% (489/489), done.Copying the Default Content
To use the default content with the site, run the following command.
$ cp -a themes/hugo-hero-theme/exampleSite/. .It copies the content in the exampleSite folder to the root of your site.
Updating Config.toml File
Next, we need to edit Config.toml file. It stores project configuration information, and it is necessary to set it up correctly for your Jamstack site to work.
For now, you need to edit the following line to it.
baseURL = "/"

themesDir = "themes"

theme = "hugo-hero-theme"
Note: You need to keep updating Config.toml file as your project progresses. Also, as you used default content, your Config.toml is updated to accommodate the example content.
Testing Out Our Jamstack Site
To run our site, we need to generate the Hugo site again with the hugo command.
$ hugoNext, we spin up the server. To do so, run the hugo serve command.
$ hugo serve#output
nitt@logan99:~/geekflare$ hugo server
port 1313 already in use, attempting to use an available port
Start building sites …
hugo v0.92.2+extended linux/amd64 BuildDate=2023-01-31T11:11:57Z VendorInfo=ubuntu:0.92.2-1ubuntu0.1
| EN
-------------------+-----
Pages | 35
Paginator pages | 0
Non-page files | 0
Static files | 23
Processed images | 0
Aliases | 0
Sitemaps | 1
Cleaned | 0
Built in 71 ms
Watching for changes in /home/nitt/geekflare/{archetypes,content,data,layouts,static,themes}
Watching for config changes in /home/nitt/geekflare/config.toml
Environment: "development"
Serving pages from memory
Running in Fast Render Mode. For full rebuilds on change: hugo server --disableFastRender
Web Server is available at //localhost:42229/ (bind address 127.0.0.1)
Press Ctrl+C to stop
Note: Your site is now hosted and available at 127.0.0.1. If, for some reason, it is not opening, try to open the alternative address given alongside. In this case, it is localhost:42973
Editing Themes Default Content
From here, you’re free to edit the default content. You can do it by going to the Content folder. Let’s edit the index page content. To do so, go to Content > Work > Index.md
This is how it looks after editing it.

Creating a Blog Site
You must choose a suitable theme if you’re only looking to create a blog. For this purpose, let’s use the Hyde theme.
Similar to how we set up our new site, you need to run the following commands.
$ hugo new site geekflare-jamstack

$ cd geekflare-jamstack/themes

$ git clone https://github.com/spf13/hyde /themes/hyde
Next, edit the Config.toml file to add the theme = ‘hyde’ value.
Create a New Post
You must run the hugo new command to create a new post, followed by the Markdown file.
$ hugo new hellogeekflare.md#output
nitt@logan99:~/geefklare-jamstack$ hugo new hellogeekflare.md
Content "/home/nitt/geefklare-jamstack/content/hellogeekflare.md" created
nitt@logan99:~/geefklare-jamstack$Editing the Post
To edit the newly created hellogeefklare.md post, open hellogeekflare.md file in your preferred text editor.
It’ll show you the following content.
---

title: "Hello Geekflare"

date: 2023-05-04T11:39:10+05:30

draft: true

---
Here, you can add any content in Markdown.
Let’s add the following content in Markdown.
### Hello, World!

This is a new post created to show how easy it is to create **Jamstack website**.
We’re using Hugo and Netlify to create our *basic Jamstack site*.
Once you put the above content in the .md file, it should look like the below (depending on your editor, we’re using Visual Studio Code).

However, it’ll look completely different when we serve it.
Note: Make sure to change the draft value from “true” to “false”
Awesome! We created two Jamstack websites, one small business site, and another blog.
After editing your site, you can generate the files by running the hugo command. It will create the file and put it in the /public folder.
$ hugo#5. Deploying the Jamstack Site to Netlify
With our site(s) created, let’s deploy them. For this purpose, we’re going to use Netlify.
Netlify is CDN backed service that offers users like you to host fast sites. You can connect Netlify with Github and automate the process. It is a free service with some features behind the paywall.
Our job is to push the code to Netlify and let Netlify handle everything for us.
Setting up Git Repository Locally
It is now time for us to set up the Git repository.
To initiate the Git repository, run the following command at the root of your project.
$ git initNext, we need to set up the theme as a submodule. This is an important step. Technically, it creates sub-repositories within your repository. (Remember, you did a git clone to the Hugo theme?). It’ll give you more control over your Jamstack site.
For example, you can download updates to your theme. You also need to do it because Netlify needs themes as submodules to host them.
So, to add the theme as a submodule, run the following command.
$ git rim --cached themes/hyde

$ git submodule add https://github.com/spf13/hyde themes/hyde
#output
nitt@logan99:~/geekflare-jamstack$ git submodule add https://github.com/spf13/hyde themes/hyde
Adding existing repo at 'themes/hyde' to the index
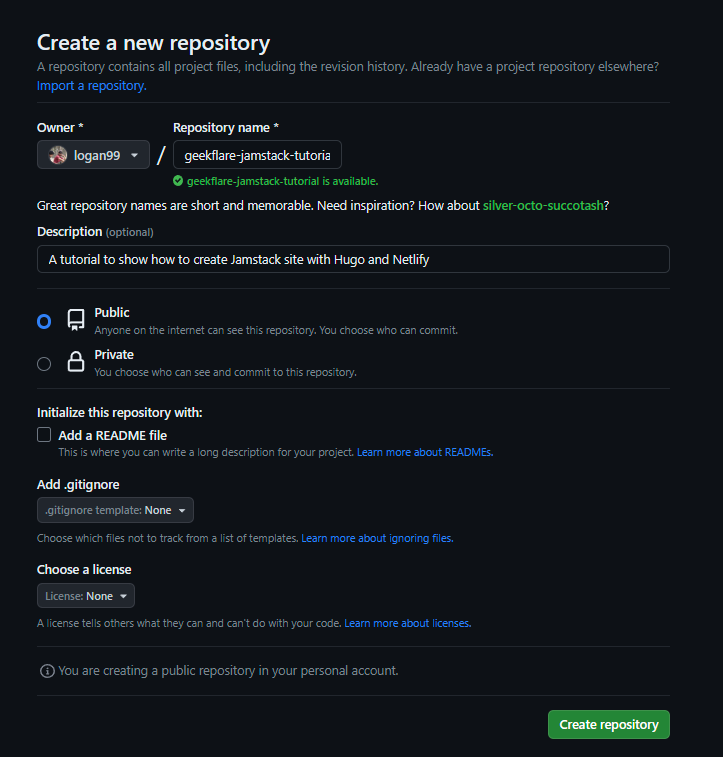
nitt@logan99:~/geekflare-jamstack$Creating a Repository on GitHub
Once the local setup is done, creating a new GitHub repository is time.
Once created, you need to add the origin to your local repository.
$ git remote add origin https://github.com/logan99/geekflare-jamstack-tutorial.gitNow, pull it.
$ git branch -M main

$ git pull origin main
Create a New commit
Now, it is time to create a new commit. Run the following command to add all the files to the main branch.
$ git add .Now, run the commit command to commit the changes.
$ git commit -m “First commit”#Output
nitt@logan99:~/geekflare-jamstack$ git commit -m "First commit"
[main (root-commit) fa69ab2] First commit
21 files changed, 1135 insertions(+)
create mode 100644 .gitmodules
create mode 100644 .hugo_build.lock
create mode 100644 archetypes/default.md
create mode 100644 config.toml
create mode 100644 content/hellogeekflare.md
create mode 100644 public/404.html
create mode 100644 public/apple-touch-icon-144-precomposed.png
create mode 100644 public/categories/index.html
create mode 100644 public/categories/index.xml
create mode 100644 public/css/hyde.css
create mode 100644 public/css/poole.css
create mode 100644 public/css/print.css
create mode 100644 public/css/syntax.css
create mode 100644 public/favicon.png
create mode 100644 public/hellogeekflare/index.html
create mode 100644 public/index.html
create mode 100644 public/index.xml
create mode 100644 public/sitemap.xml
create mode 100644 public/tags/index.html
create mode 100644 public/tags/index.xml
create mode 160000 themes/hydeFinally, push the changes to GitHub.
$ git push --set-upstream origin main
Note: You must enter your GitHub username and password to work.
#6. Working with Netlify
Excellent, our repository is now created. Now, we move to Netlify. If you already have an account, log in or create a new account.
For newer accounts, it’ll instantly run a wizard for you. Otherwise, you’ll land on your account dashboard. If you land on the dashboard, click the “Add new site” option under Sites.
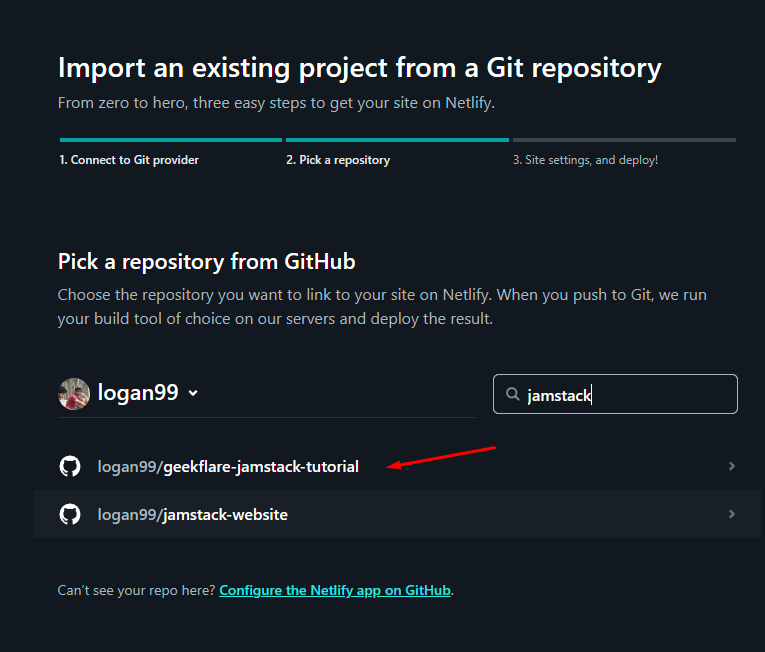
Under Add new site, choose “Import an existing project.“

It’ll then ask you to choose a Git provider. As we’re using GitHub, we’ll choose it. You can also opt for Bitbucket, GitLab, and Azure DevOps.

It’ll then list all your projects. From here, select the GitHub repository you created for this project. For us, it is the “geekflare-jamstack-tutorial.” You can also choose to upload the other project that we created.
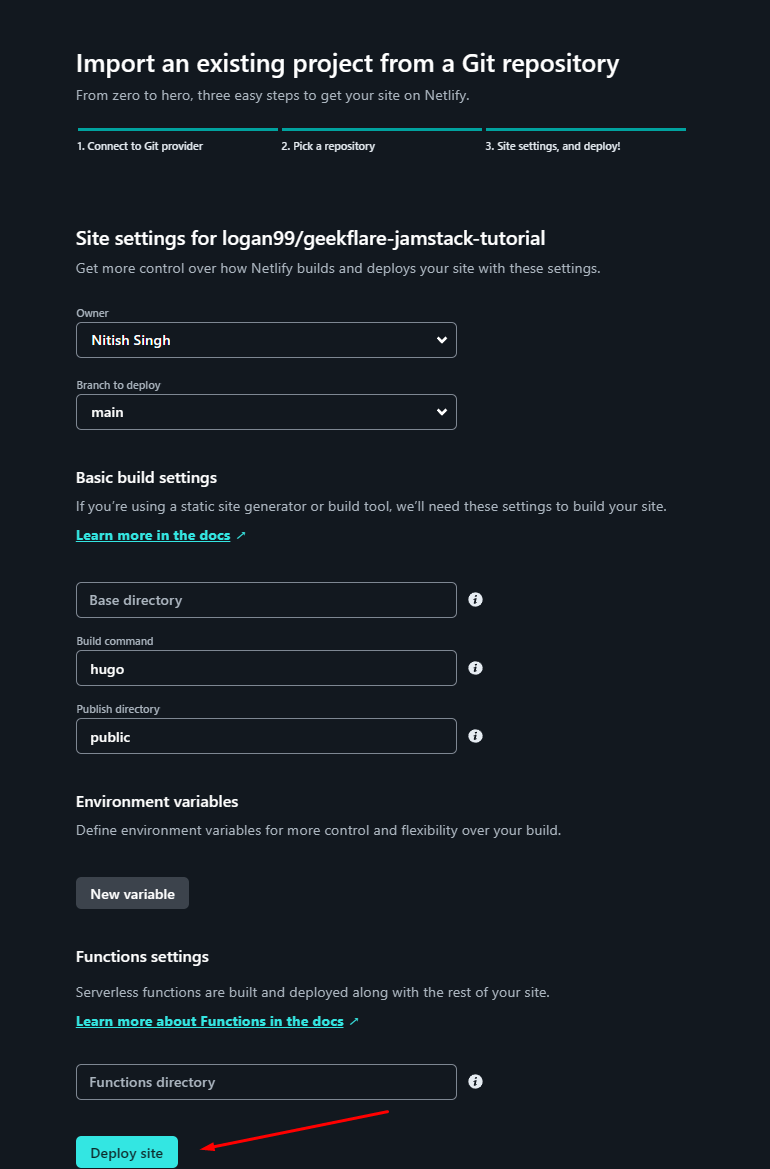
It’ll then ask you to select the branch to deploy and choose basic build settings. For now, you can set everything to default.
Click on “Depoy Site” to deploy it.
Now, you need to wait for Netlify to do its thing. Once deployed, the message will be “Your site is deployed.”
Now, click on the site at the top left.
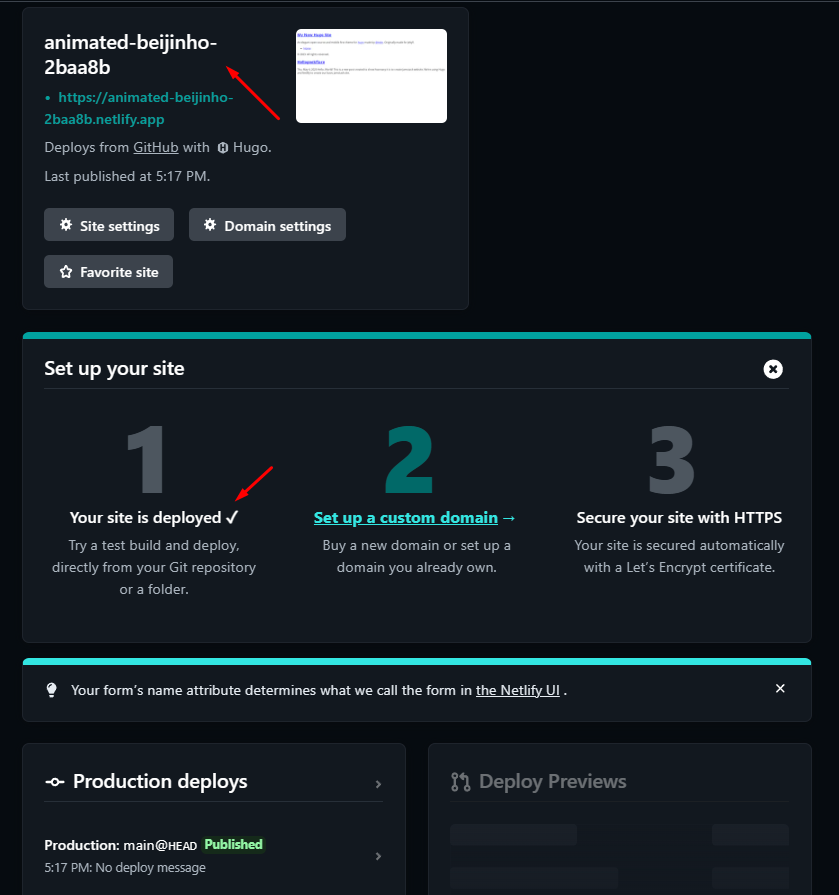
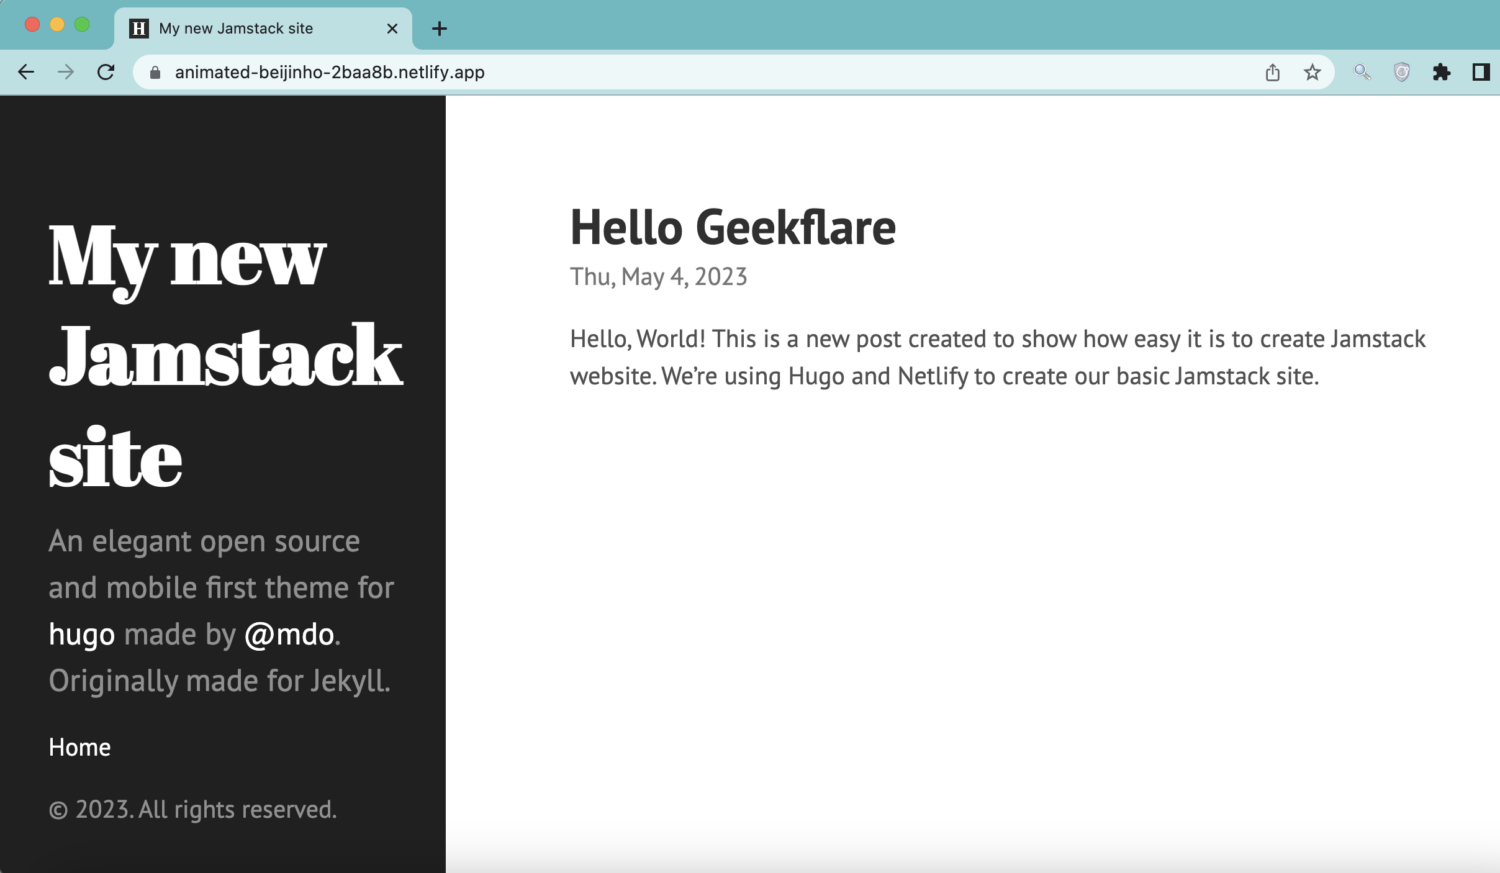
However, you’ll notice that the site is not loading correctly. This is because the base URL in the Config.toml file is not set correctly. As Netlify generated a new project URL, you must add it to the Config.toml file.
In our case, the site is at https://animated-beijinho-2baa8b.netlify.app/
That means we need to add the baseURL to it.
To do so, go to your local setup and change the value.
baseURL = 'https://animated-beijinho-2baa8b.netlify.app/'

languageCode = 'en-us'

title = 'My new Jamstack site'

theme = 'hyde'
To push the change, you need to run the following command.
$ git add .

$ git commit -m “changed baseURL to make it work on Netlify”
Netlify is smart. When it detects a new commit, it automatically deploys your site again.
If you load your site now, it’ll load perfectly.
Wooo! You have done it. I know there is a lot to learn. However, you’ll find the whole process intuitive once you do it a few times.
Final Words
Jamstack has hooked the new era of developers. It unlocks performance and also improves how sites are deployed. Jamstack has grown with excellent ecosystem members such as Hugo and Netlify. Undoubtedly, it’ll only grow from here.
Next, check out how to deploy the frontend application to Netlify.