Learn to create crypto wallets with our step-by-step guide and safeguard your digital assets!
A crypto or cryptocurrency wallet is a physical device or software application that allows you to store, transact, and manage your digital assets. Therefore it’s important to have a wallet to store your cryptos safely.
The increased demand for crypto trading and investing led to the rise of wallet users worldwide. Moreover, there are over 420 million global crypto owners.
According to Grand View Research, the crypto wallet’s global market size was $8.42 billion in 2022. In addition, the market is expected to grow at a compounded rate of 24.8% between 2023 and 2030.
The advantage of having a crypto wallet include the following:
- Security: You can securely store your assets directly in your wallet without risking them with any third-party exchanges or platforms.
- Ownership: Here, you’ll be the sole owner of your assets and have complete freedom to manage your cryptos.
- Privacy: You don’t need to provide your personal information to create a wallet.
- Ease of Use: Crypto wallets are user-friendly, and you can manage your assets in a few steps.
- Multi-crypto Support: A single wallet can store and transact numerous cryptocurrencies.
Before we create a wallet, it’s important to know its types. Let’s get straight into that!
Types of Crypto Wallets
Crypto wallets can be classified into three major types:
Custodial and Non-Custodial Wallets
Based on the user’s ownership, wallets are of two types:
#1. Custodial Wallets
Custodial wallets don’t provide you the complete ownership of your wallet and the assets stored in it. Moreover, the wallet control is shared between you and the third-party platform, app, or exchange.
These wallets also require completing KYC and anti-money laundering (AML) verifications. Also, here you’re trusting your assets completely with the platform.
However, you can use custodial wallets if you’re a beginner in the crypto space with minimal assets. Moreover, you can use this crypto wallet to conduct basic studies on crypto storage and transaction.
#2. Non-Custodial Wallets
Non-custodial wallets allow you to store and transact your assets with complete ownership. In this case, you don’t need to trust any middleman to store your assets.
Besides, you can create a non-custodial wallet without revealing your identity. Unlike the custodial wallets, there’s no need for KYC or AML verifications here.
It’s always best to use non-custodial wallets, as providing access to your cryptos is extremely risky. Also, you can recover your wallet simply with the help of the seed phrase.
Hot and Cold Wallets
Based on internet connectivity, wallets are further divided into hot and cold wallets. Let’s explore it.
#1. Hot Wallets
Wallets that are mostly connected to the internet are called hot wallets. Moreover, these wallets are used for quick and easy crypto transactions.
However, these wallets are vulnerable to online hacks. Software wallets come under hot wallets.
#2. Cold Wallets
Cold wallets are offline wallets that are disconnected from the internet. Besides, being offline safeguards users’ assets from hackers.
Hardware and paper wallets are examples of cold wallets. Moreover, hardware wallets are the safest method to store your cryptos.
Software, Hardware, and Paper Wallets
#1. Software Wallets
Software wallets are hot wallets that function with the help of the internet. These crypto wallets are further classified as:
👉 Desktop Wallet that works on your PCs.
👉 Mobile Wallet can be installed as an app on your mobile device.
👉 Web Wallet comes as a browser extension.
#2. Hardware Wallets

Hardware wallets are small devices that allow you offline storage of your cryptocurrencies. Also, you can find good hardware wallets on a budget of around $150.
Security is the most important feature of a hardware wallet. Moreover, your crypto assets stay isolated from the internet as long as you wish.
#3. Paper Wallets
A paper wallet is an offline wallet consisting of written or printed paper with public and private keys. In addition, these wallets are usually used to store huge amounts of crypto tokens.
The absence of internet connectivity makes paper wallets one of the safest options for crypto storage. However, the major problem is that if you lose your paper, you won’t be able to access your stored cryptocurrencies.
Now let’s understand the process involved in the creation of wallets. Stay along!
How to Create and Use a Crypto Wallet?
As we discussed above, there are various types of wallets, and the steps to create a wallet are also different.
Confused about choosing the right wallet provider? You can choose the best wallet based on the cryptocurrency you mostly buy or transact. For example, if Litecoin is your favorite cryptocurrency, you can choose from the best Litecoin wallets.
In fact, we have detailed articles that help you to find the best:
Now, let’s get into wallet creation, starting with desktop wallets!
Steps to Create a Desktop Wallet
Here, let’s take the case of Atomic Wallet.
Step 1: Visit the official website of Atomic Wallet.

Step 2: Next, click the “DOWNLOAD” icon, and choose your supported OS from Windows, MacOS, Ubuntu, Debian, or Fedora. Here, I’m downloading the file on my Windows PC.

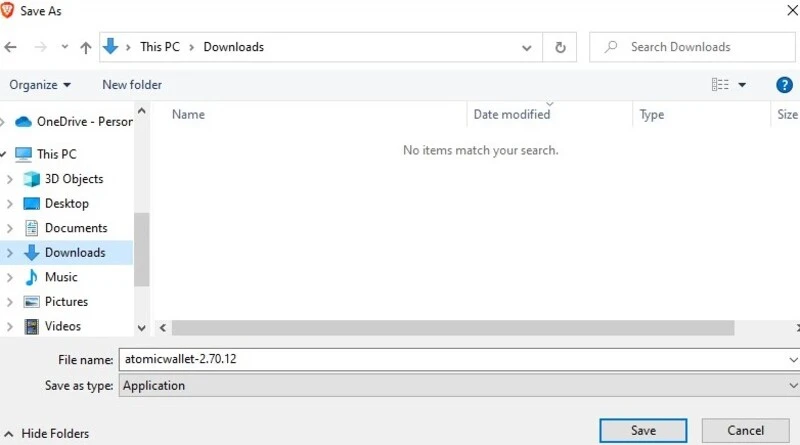
Step 3: Then, you need to choose the location to download your file.
Step 4: Once the download is successful, you can install the Atomic Wallet. Overall this installation process completes within a minute.

Step 5: After the wallet installation, open it and select “NEW WALLET.”

Step 6: Now you have to enter a password and click “SET PASSWORD.”

Step 7: This step is very important! Here you need to note down the 12-word backup phrase of your wallet. It’s best to write it down on paper. Then click “OPEN WALLET.”
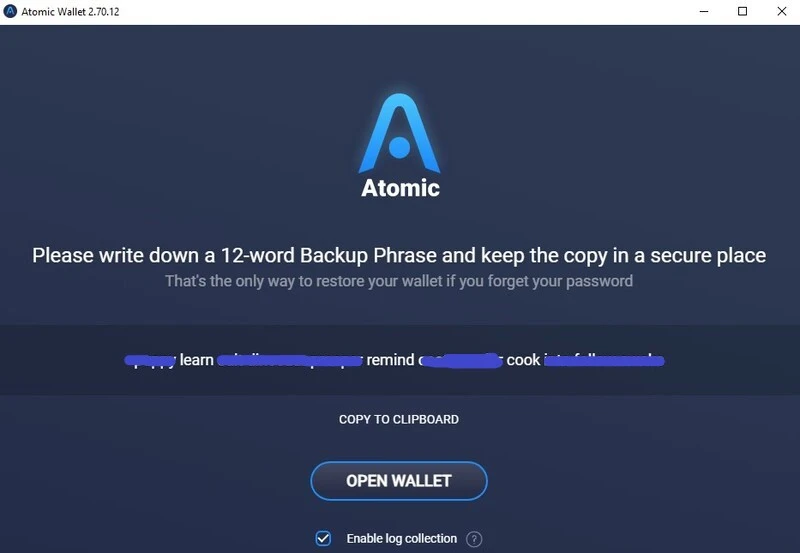
Congrats! Your crypto wallet is ready.
Features of a Desktop Wallet
The major features that come along with a crypto desktop wallet include the following:
- Monitor Assets: You can use this feature to track the value, current price, and price change of your cryptocurrencies.
- Instant Exchange: You can instantly exchange two cryptos in a few seconds using this feature.
- Receive Cryptos: Here, you can share your wallet address as an alphanumeric or QR code to receive cryptocurrencies.
- Buy Cryptos: With the help of Visa or Mastercard, you can purchase crypto tokens with fiat currencies.
- Transaction History: All wallet transactions will appear in your wallet’s “History” section.
- Crypto Staking: If you plan to earn passive income from the stored tokens, you can opt for crypto staking.
- NFT Section: Most desktop wallets provide a dedicated section to store and receive NFTs.
- Security: You can always view your private keys using your wallet password. Also, to create a new password, you need to enter your private keys.
- Customer Support: In case of any wallet issues like transaction delays or failures, you can contact the customer care team directly from the wallet.
Steps to Create a Web Wallet
As you know how to create a desktop wallet, it will be easy to create a web wallet.
Here, we’ll create Trust Wallet’s web browser. Stay tuned!
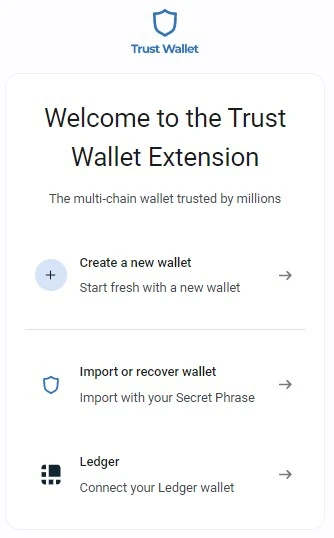
Step 1: Visit the Trust Wallet website and click “Browser Extension” from the home page.

Step 2: Now click “Get Trust Wallet.” Moreover, this browser extension is available for Chrome, Brave, Opera, and Edge browsers.

Step 3: Click “Add to Brave/Chrome/Edge/Opera.” I’ll add this extension to my Brave browser.

Step 4: Next, click “Create a new wallet.”
Step 5: Then, choose a password for your wallet and click “Proceed.”

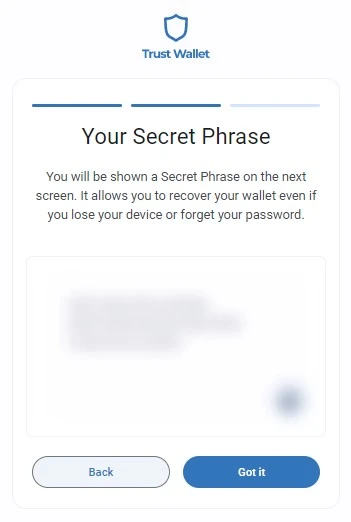
Step 6: You’ll be shown your wallet’s secret phrase next. Note it down and click “Got it.”
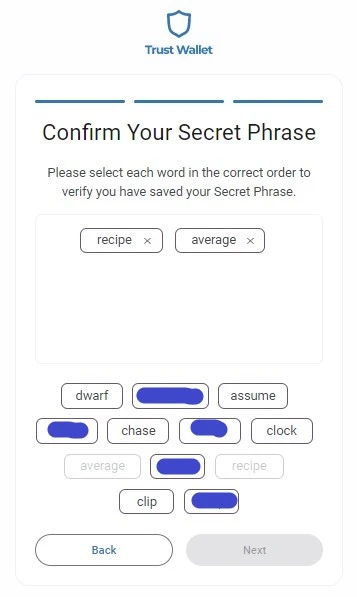
Step 7: Confirm your secret phrase, and click “Next.”
That’s it; your web wallet is ready! Now click “Open wallet.”
Features of a Web Wallet
Web wallets are not that feature rich compared to desktop wallets. However, these crypto wallets are very convenient and help you with quicker crypto transactions. Its major features include:
- Monitor Cryptos and NFTs: With just a click, you can monitor your cryptocurrencies and NFTs stored in your wallet.
- Send, Receive, and Buy Cryptos: Web wallets are helpful when you look for quick crypto transactions.
- Transaction History: Here, you can review your crypto transactions without logging into third-party apps.
- DApp Connectivity: The web browser allows you to connect with DApps in a few seconds. In addition, you can add multiple DApps for your crypto transactions.
Steps to Create a Mobile Wallet
Almost all mobile wallets are available on Google Play and App Store. Therefore, we’ll explore the Phantom mobile wallet for Android devices. Are you an iOS user? Don’t worry; the wallet creation process is almost similar.
Step 1: Install the Phantom wallet from Google Play.
Step 2: Open the app and click “Create a new wallet.”

Step 3: Add fingerprint security lock and click “Next.”

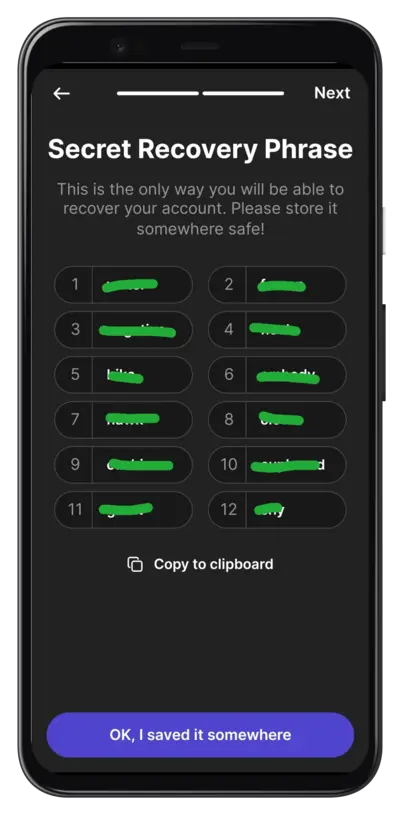
Step 4: Store your “Secret Recovery Phrase.”
Step 5: Finally, click “Get Started.”

Your mobile wallet is ready for use!
Features of a Mobile Wallet
The impressive features mobile wallets provide include the following:
- Manage Crypto Tokens: You can add a list of your favorite tokens and monitor their real-time value and price.
- Deposit, Buy, and Send: These mobile wallets are helpful for quick crypto transactions.
- Instant Swap: You can swap between two crypto tokens instantly.
- Multiple Wallets: You can add numerous crypto wallets to diversify your portfolio here.
Steps to Set up a Hardware Wallet
Setting up a hardware wallet might sound complicated, but it’s untrue. Here we’ll take a prominent hardware wallet, Ledger Nano X, as an example.
Step 1: Purchase Ledger Nano X.
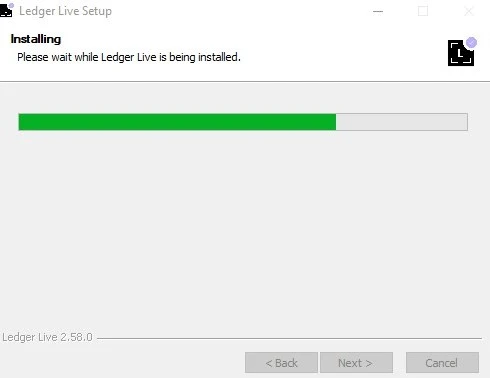
Step 2: Download the “Ledger Live app.”

Step 3: Then install it on your PC.
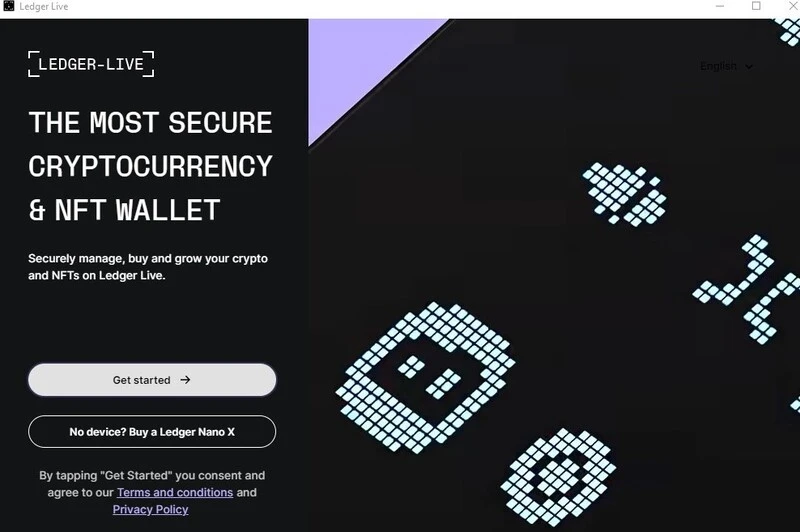
Step 4: Open the Ledger live app and click “Get Started.”
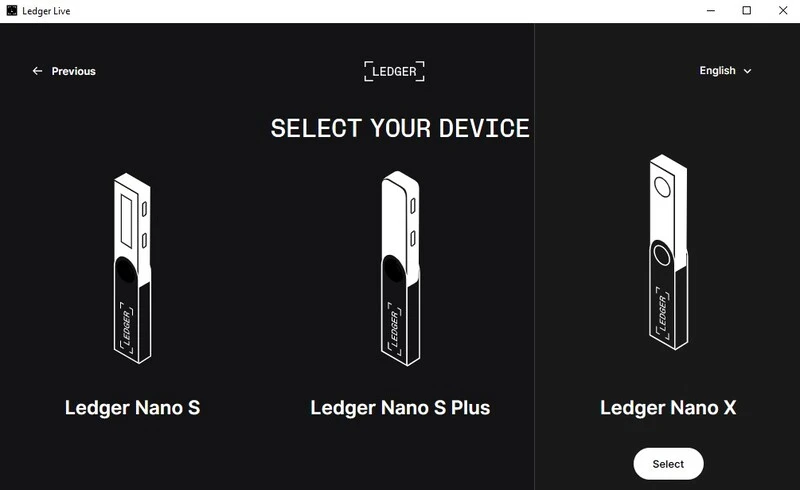
Step 5: Select “Ledger Nano X.”
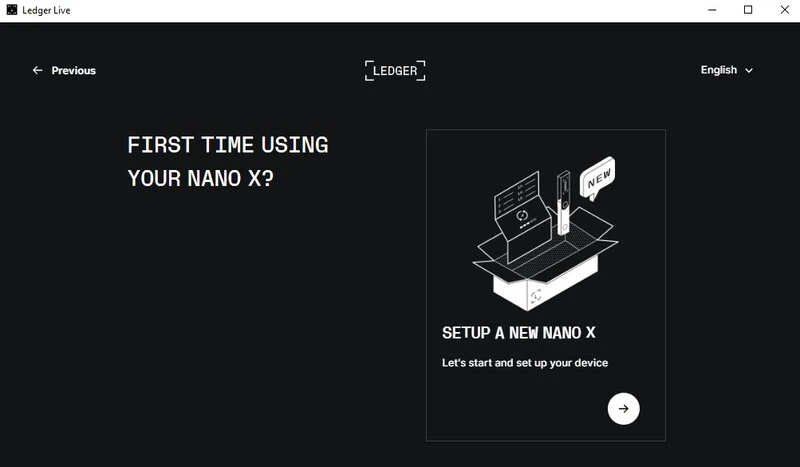
Step 6: Next, click “SETUP A NEW NANO X.”
Step 7: Now connect your Nano X to your computer using a USB cable and select “Set up as a new device.”
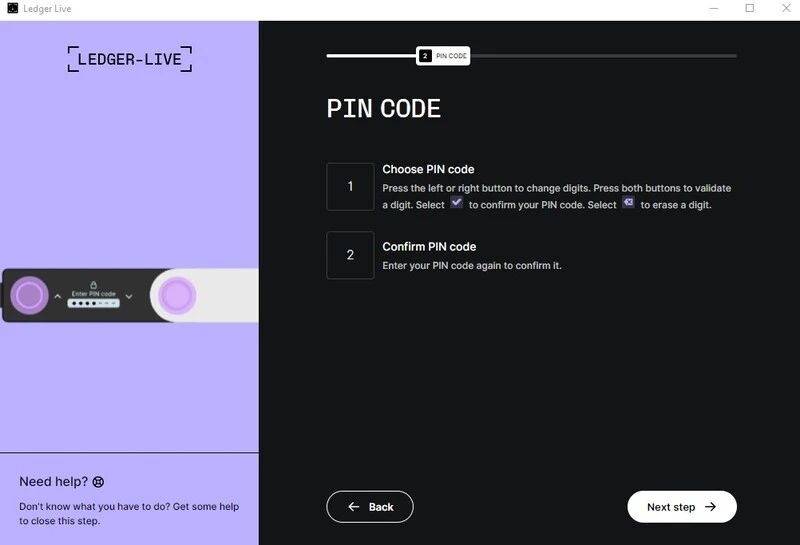
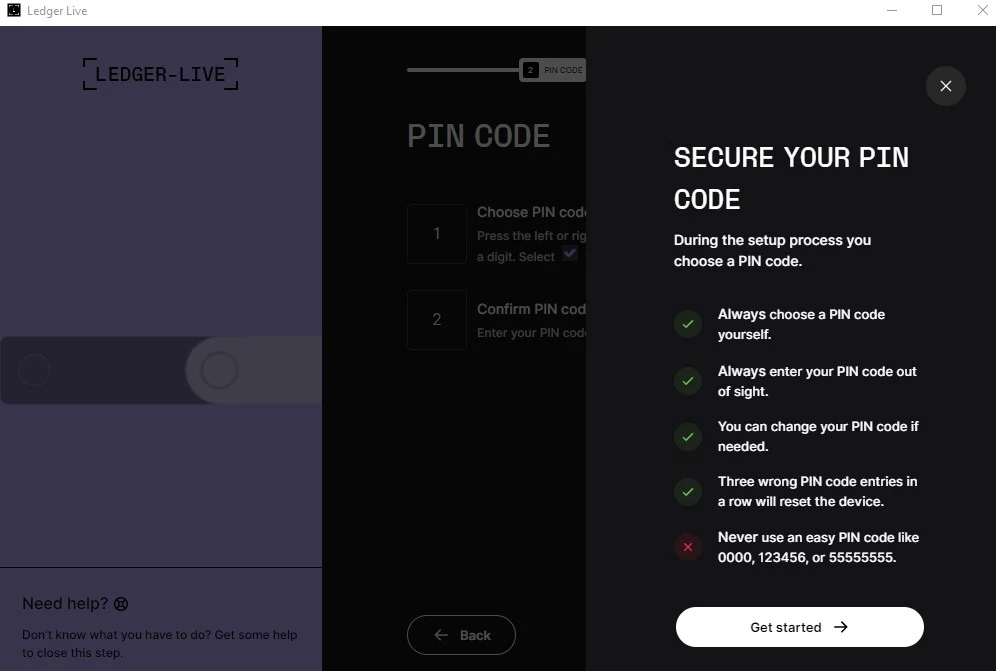
Step 8: Choose a PIN code for your device. Ensure to choose the code with at least 4 digits. Therefore you can use the left or right physical button to set your code.
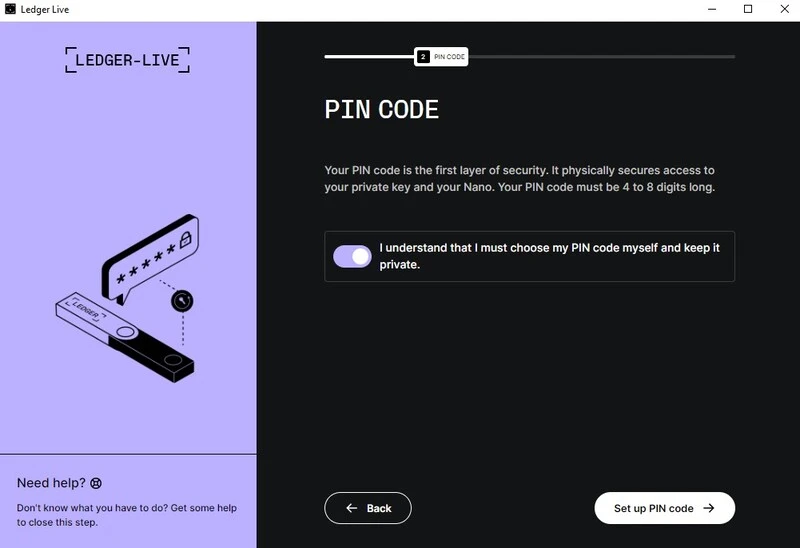
Step 9: Then, enter your PIN code again and confirm it.
Step 10: After choosing a safe PIN code, click “Get started.”
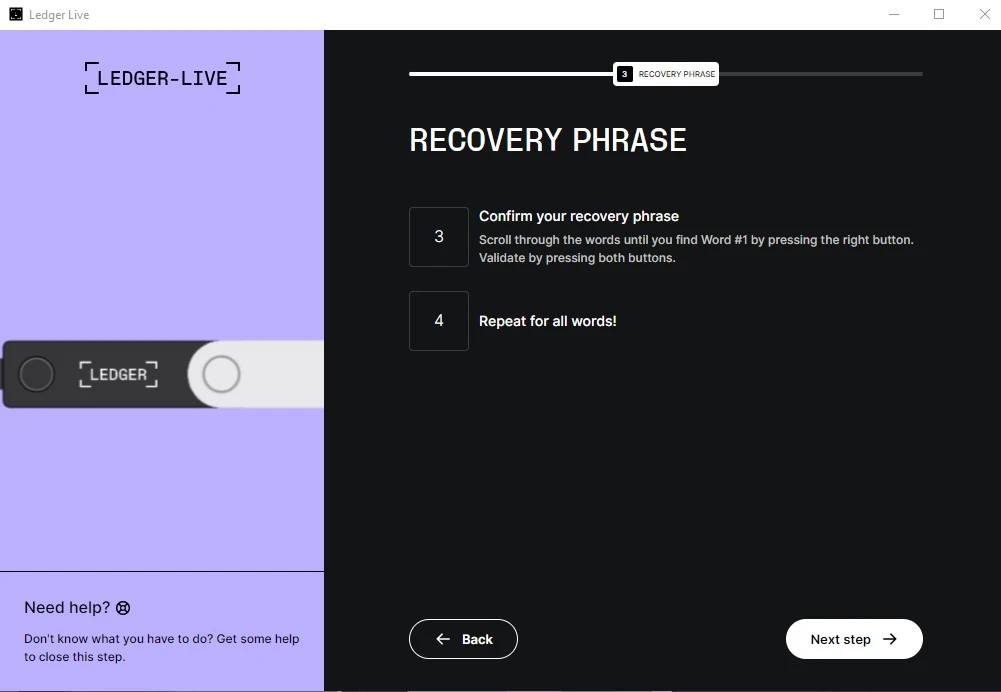
Step 11: Nano X comes with 3 blank recovery sheets. So, take one sheet and write down your 24-word recovery phrase.
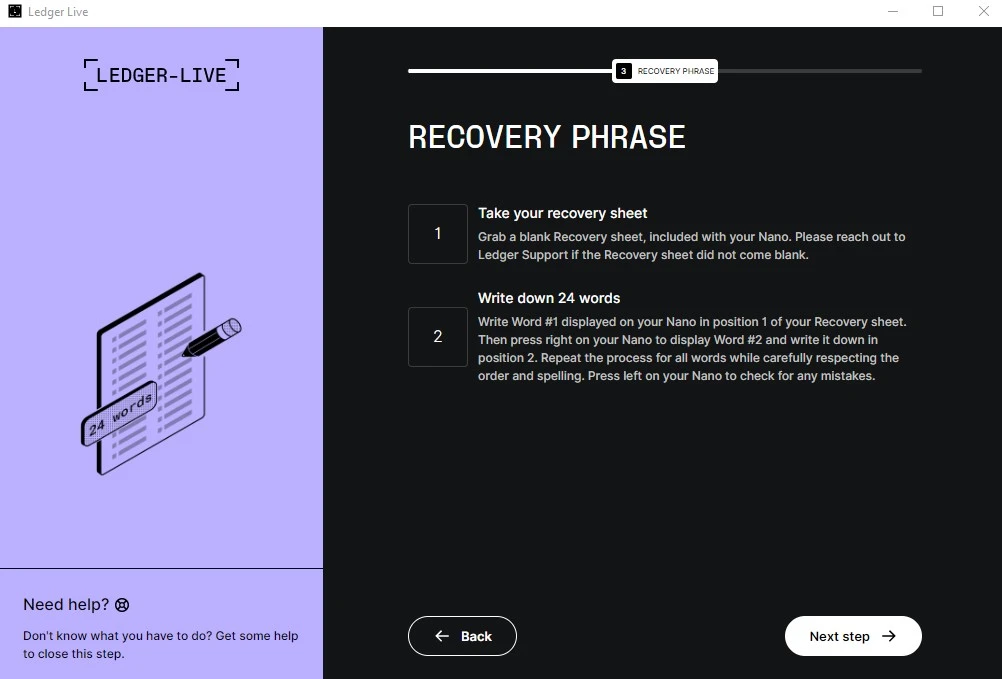
Step 12: Then confirm your recovery phrase by entering the 24-word phrase on your device.
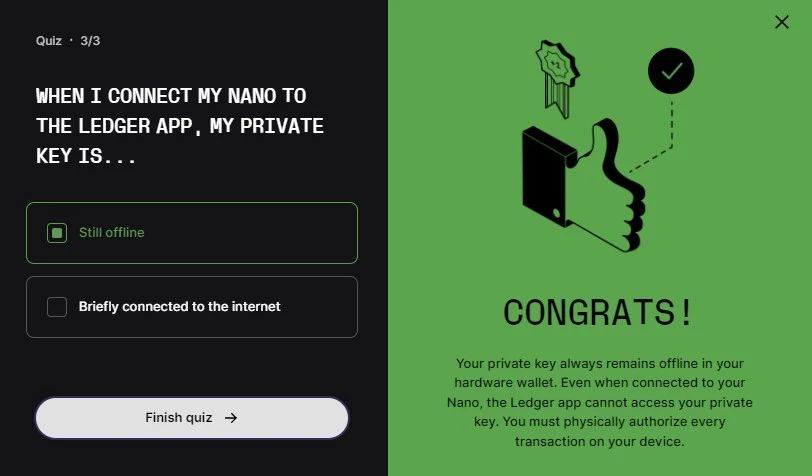
Step 13: Also, finish a 3-question quiz and click “Finish quiz.”
Step 14: Finally, click “Check my Nano” to verify the genuineness of your device.

That’s it! Your hardware wallet is ready for use.
Features of Hardware Wallet
Your crypto assets stay secured inside the hardware wallet. Furthermore, you can monitor the value of your assets using the wallet’s software like “The Ledger Live app.”
- Track Live Prices: You can check the live price of your cryptocurrencies in real-time.
- Buy and Sell Cryptos: Using the software, you can buy or sell supported cryptocurrencies.
- Swap Cryptos: You can exchange two cryptocurrencies using the instant swap feature.
- Manage NFTs: Apart from cryptos, you can store, send and receive your favorite NFTs.
Best Practices to Secure Your Crypto Wallets
You can follow these practices to enhance the security of your wallet:
Enable 2FA Authentication
Enabling Two-factor authentication (2FA) on your wallet can add an extra security layer. Moreover, this two-step verification process helps to restrict the chance of unauthorized wallet access.
You can also add biometric authentication as one type of verification. Then, you can add email or SMS OTP verification as the next type.
Use Multiple Wallets
Depending on a single wallet for your entire crypto storage is very risky. So, it is always better to create and use multiple crypto wallets.
Suppose you have a substantial amount of cryptos for long-term investment; in that case, storing it in hardware wallets is better. Otherwise, if you are a trader who frequently buys and sells tokens, you can use mobile, desktop, or web wallets.
Use Strong Wallet Passwords
Ensure to set wallet passwords that are difficult to guess. In addition, always use strong and unique passwords while creating a wallet.
Moreover, keep separate passwords for all your wallets. Also, include a combination of special characters, numbers, and upper and lowercase letters.
Store Seed Phrase Offline
Giving away your seed phrase is similar to handing over your locker keys. Therefore, you must always avoid storing these phrases in emails, cloud storage, or notepad apps.
By all means, the best and safest way to store your seed phrase is to write it on paper. Moreover, ensure to store this paper in a secure place.
Connect only with Authentic Exchanges or DApps
In fact, you can find hundreds of exchanges and DApps in the crypto space. As a result, there is a high risk of trusting your wallet with these third parties.
Limit the wallet connectivity with the trusted names in the crypto industry. Moreover, conduct basic research before providing permission to connect your wallet.
Final Thoughts
Wallet creation is not difficult; you can create crypto wallets in a few minutes. Therefore all you need is to follow the simple steps discussed in this article.
In conclusion, here we have covered all steps required to create a new desktop, web, mobile, and hardware wallet. After all, ensure to keep your seed phrases safe.
You might also be interested in the best hardware crypto wallets.