Sharing code and collaborating on open-source software has been transformational in software development. It has enabled developers to build more complicated applications with smaller teams using existing packages and libraries.
In the Python ecosystem, most packages are registered on the Python Package Index (PyPI). Using the index, developers can share their code as packages for other developers. To create your own package and upload it to PyPI, you will need a pyproject.toml file. This article is a guide on how it works.
What is pyproject.toml?
Before we get to what the file is, let us first understand the gap it is trying to fill. When you upload a package to PyPI, it will become installable using pip. For example, if your package is called example-package after uploading to PyPI, it would be installable using the command:
pip install example-packageWhen publishing packages to the Python Package Index, you upload a .whl file. But when you write code, you mostly write .py files, so how do you generate a .whl file? You use a build tool such as setuptools or poetry.
This tool will take your source code and convert it to a .whl file that can be uploaded. As mentioned before, there are multiple tools you can use to generate a whl file. To specify which tool you want Python to use, you write it in the pyproject.toml file.
Therefore, the pyproject.toml file is a file that specifies how your Python project should be built into a package. In addition to that, you can provide additional information, such as your package’s metadata, that will be displayed on your package’s listing on PyPI.
The Python Build Process
To run the build process tool, you use the command,
python -m buildBut before you can do that, you need to install it
python -m pip install buildWhen you run the build command in a project that contains a pyproject.toml file, it will create new files and directories. These include the dist folder, which contains two files, a compressed archive file called sdist and a .whl file that you then distribute on PyPI.
How to Generate a Python Package?
To help you solidify what we have just learned, here is a walkthrough example of generating a Python package.
#1. Create an Example Project
To begin, create a simple package with the following folder structure
example_package/
├─ example_package/
│  ├─ example_module.py
│  ├─ __init__.py
├─ pyproject.toml
├─ setup.cfg
├─ README.md
The project root directory is called example_package. That is where our entire codebase is contained. Inside the project root, we have three files and a directory. Their contents are explained below:
pyproject.toml
This file contains information about what build tools to use when building your project. For this simple example, these are the contents:
[build-system]
requires = ["setuptools"]
build-backend = "setuptools.build_meta"
In this case, we are declaring setuptools.build_meta as our build backend. But setuptools.build_meta is contained inside the setuptools package, so first, we list it as a requirement in our list of requirements. We will discuss more options you can specify later in this article.
README.md
Contains information about your package. This will be displayed as documentation on your package’s page on PyPI. You can write anything in that file.
setup.cfg
The setup.cfg file contains project metadata, such as the name of the package and the current version. For now, add the following code as the contents of setup.cfg:
[metadata]
name = example-package
version = 1.0.0
example-project
Contained within our root directory is another directory with the same name. This directory is where our source code resides. For demonstration purposes, I included two files:
- example_module.py – This contains a dummy function. You can do the same as well.
- __init__.py – It will make the directory a package that can be imported. It can be empty.
#2. Run the Build Command
Now, you can run the build command in the project root directory.
python -m buildIf you have not, make sure you install the tool using the following:
pip install buildYou should get an output that looks like this:
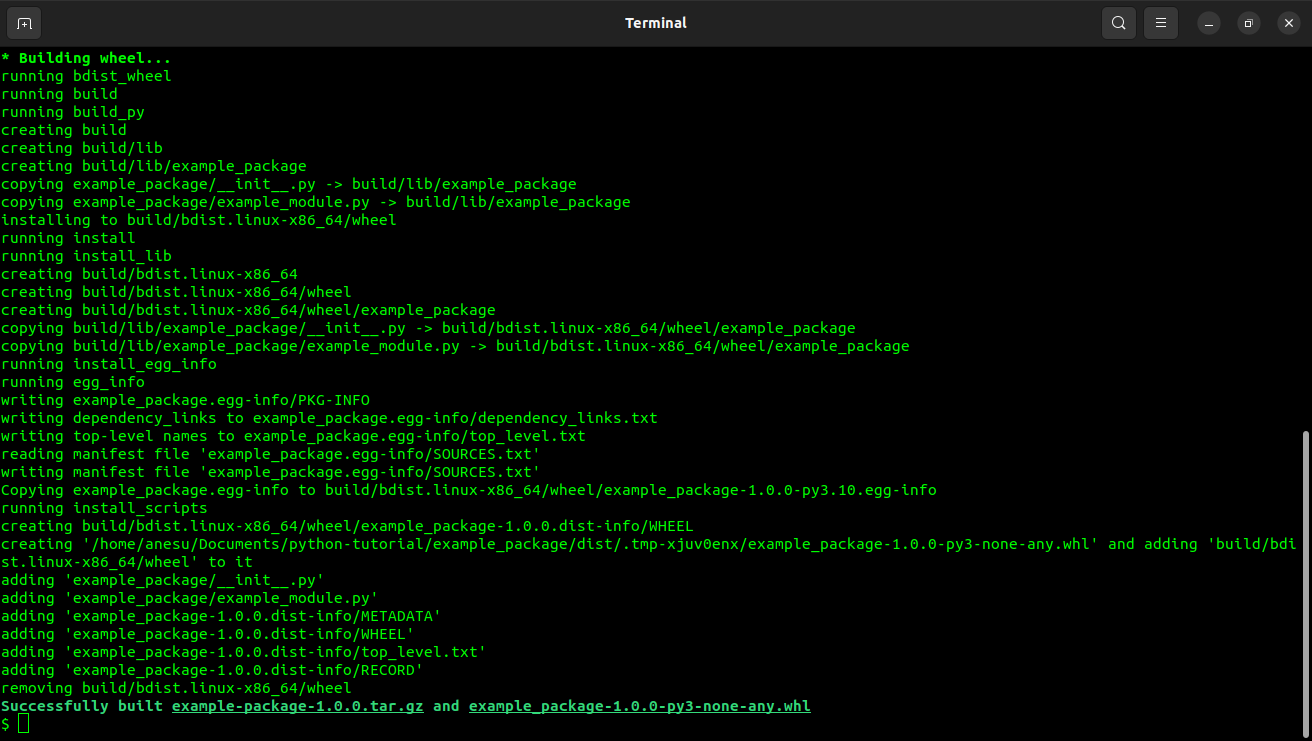
As you can see, the last line tells you that it built example-package-1.0.0.tar.gz and example-package-1.0.0-py3-none-any-whl. When you list your directory contents using the ls command below, you should see new files.
lsThe output should be as follows:
dist example_package example_package.egg-info pyproject.toml README.md setup.cfg
If you list the contents of your dist directory, you should find the .whl file and the tar.gz file.
$ ls dist
example_package-1.0.0-py3-none-any.whl
example-package-1.0.0.tar.gz
Contents of the pyproject.toml file
In our simple example, we only specified the build system of our Python project. However, you can add more information to your pyproject.toml file. These are some of the common options.
metadata
Instead of specifying metadata in the setup.cfg, you can write it in your pyproject.toml. This information will be used when creating a listing for your package on the package index.
In addition, you can specify the dependencies of your package and their versions so they can be installed when your package is installed.
[project]
name = "hello-world"
version = "1.0.0"
description = "My first Python package"
requires-python = ">=3.8"
keywords = ["python", "first-project"]
authors = [
    {name = "John Doe", email = "john@example.com"},
]
dependencies = [
    "requests",
    "gidgethub[httpx]>4.0.0",
]
tool.<tool_name>
You can also use tool.<tool_name> where <tool_name> is the name of the tool to provide different configuration options for the tools you use.
This can only be done with tools that support configuration using this method. For example, you could pass in configuration options to Black, a code linter.
[tool.black]
line-length = 88
target-version = ["py38", "py39"]
Example file
Putting together what we have learned, here is an example of a pyproject.toml file:
[build-system]
requires = ["setuptools>=42", "wheel"]
build-backend = "setuptools.build_meta"

[metadata]
name = "my-project"
version = "1.0.0"
description = "A sample project"
author = "Your Name"
author_email = "your.email@example.com"
license = "MIT"
keywords = ["sample", "project"]

[options]
python_requires = ">=3.6"

[tool.black]
line-length = 88
include = "\\.pyi?$"
exclude = '''
/(
  \.git
  | \.hg
  | \.mypy_cache
  | \.tox
  | \.venv
  | _build
  | buck-out
  | build
  | dist
)/
'''

[tool.blackd]
port = 45484
host = "localhost"
For more information, read this page.
Advantages of pyproject.toml
✅ It provides a standard way to manage dependencies for Python projects. The dependencies
and other relevant metadata of projects can be specified in a declarative manner.
✅ It also provides a way to specify other metadata in your projects, such as the authors, licence, and GitHub URL, among other helpful attributes.
✅ It fits in with different build systems, and switching build systems is easy.
Final Words
pyproject.toml is a useful standard that helps avoid the disadvantages of using setup.py. It is most useful when you are creating packages for distribution. For most new projects, you should use pyproject.toml instead of setup.py.
Next, check out how to check the Python version in Windows, Linux, and macOS.